Social Games
Relic Quest Cheats: Tips & Tricks for Your Museum
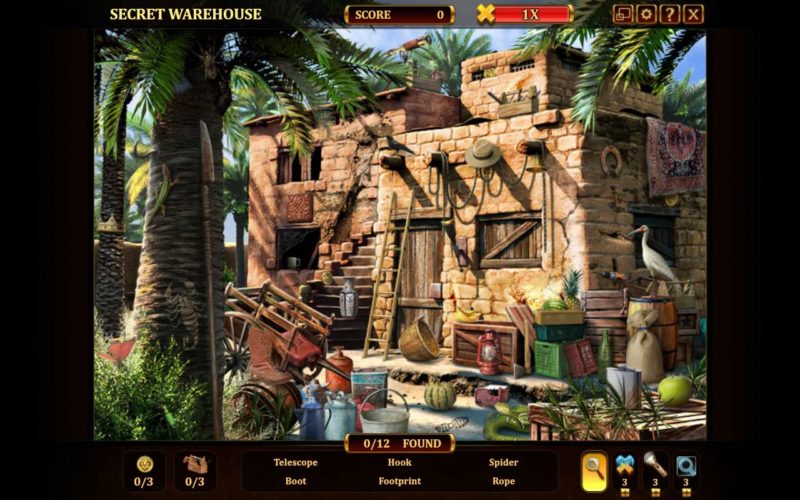
One of the latest featured apps on Facebook, Relic Quest, started to take a lot of my free time. As stated in my Relic Quest review, the game is not perfect, but does a really great job at keeping you hooked and delivering a great hidden object experience. However, things can get even better for you and so I have decided to created this Relic Quest cheats article with tips & tricks to help you get the most out of the game.
So if you got stuck along the way or simply you need to tune up your game, read on and hopefully it will happen.
1. Follow the game’s story (missions)
There’s no need to get ahead of stuff and instead you should focus on completing the missions. They help you go through the scenes and the game at the intended pace and you won’t find yourself stuck at a point, having to gather a ton of materials because you have just used them on something that you shouldn’t have. Simply follow the story and everything will work great!
2. Complete the same scene over and over again
It’s pretty obvious that you get to learn the placement of the items in each scene the longer you play it. Therefore, it’s a great strategy to focus on playing a single scene at a time in order to boost your scores and have the item positions fresh in your mind. Even the coins and tool boxes, who change positions if you replay a scene usually have just a few places you can find them in and soon you won’t have a problem getting all the items ASAP.
3. Focus on combos
It’s difficult at start, but you should be able to do it pretty soon afterwards: combos are the key to faster mastery and, of course, huge scores. So quickly scan the list of items you need to find and click those that you already know where they are, plus any coins and tool boxes you find along the way. When you don’t know an item’s position, simply click the hint button as the combo meter does not reset and maybe by the time you click it you notice another and can keep up the great run.
4. Don’t use power-ups when you start a scene
Many gamers tend to use their power-ups or boosts when they start playing a new scene – especially the one that reveals all the hidden items. This is a mistake because you are not familiar with the scene, the object requirements will change and you will most likely forget where the items were and actually waste the power-up. It’s better when you are pretty familiar with the scene to use such a power-up to make sure that you get a high score.
5. Add neighbors/friends
Except for the fact that you need them for completing some missions, friends are vital in the game to keep your energy levels high and help you around. Therefore, add at least four neighbors to keep everything running smoothly. If you don’t have any actual friends playing the game and you can’t convince any, you will surely find active players over at the game’s official Facebook page.
6. Museum decorations
Usually, you need to focus on getting the decorations requested by the missions in order to complete scenes, but as soon as that is not enough, build decorations yourself. What you build does not matter much, what you should care about is the museum rating improvement (hover over the items to see it). You also need to build items that you meet the requirements for, so make sure that before you buy, you hover your mouse over the item as it will show you its requirements.
As a golden rule of thumb, the more expensive exhibits are giving you more Museum Rating points than decor items, but the decor items don’t need extra items to be built. So actually, if you have enough coins, it’s a better idea to get decor items to increase the ratings and keep those hard to get items in case you really need them (to build an item for a quest, for example).
And this would be it! These Relic Quest tips and tricks should be enough to get you started and help you rack up the high scores and crush the competition. If you have other tips and tricks to share with us, let us know in the comment section below.


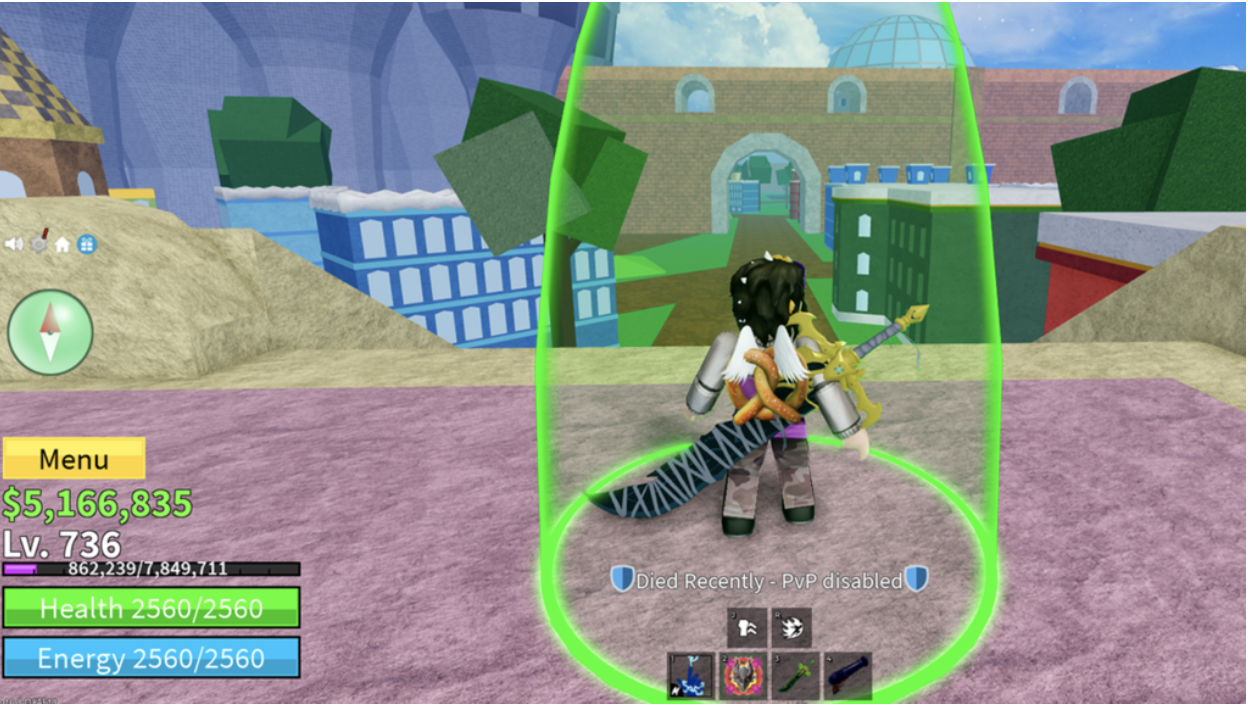
Money is one of three primary currencies in Blox Fruits. It lets players purchase items like Fighting Styles, Swords, Guns, Blox Fruits, Accessories, Abilities, and Raid Chips. While the prices are high, Money is the most accessible currency in the game, players can earn it quickly through straightforward methods.
Players can hold up to $1,000,000,000, giving them substantial purchasing power. In this guide, we’ll reveal the fastest ways to maximize your Money earnings in Blox Fruits, helping you afford the upgrades you need.

How to Get Money Fast in Blox Fruits
Blox Fruits offers multiple ways to earn money. Each method has its advantages, whether you’re looking for steady income or quick cash injections.
Money can be earned through:
- Purchasing with Robux
- Game Passes
- Defeating Enemies & Bosses
- Redeeming codes
- Quests
Let’s break down each method to help you choose the best approach for your gameplay style and goals.
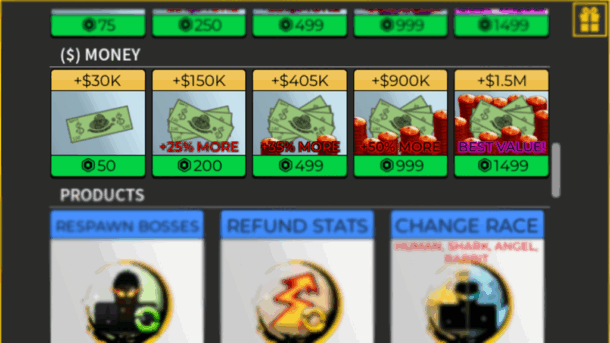
Purchasing With Robux
Buying Money with Robux offers instant access to the exact amount you need. Players can purchase:
- 30,000 Money (50 Robux)
- 150,000 Money (200 Robux)
- 405,000 Money (499 Robux)
- 900,000 Money (999 Robux)
- 1,500,000 Money (Best value at 1,499 Robux)
While 1,499 Robux may seem steep, many players choose this route for its immediacy and guaranteed results. Some even buy Robux specifically to acquire their target Money amount, skipping the grind of other earning methods.
To purchase Money in-game, open Menu, select “Shop,” scroll to ($) Money, and choose your amount. Alternatively, visit Blox Fruits on Roblox’s website, click “Subscriptions & Passes,” and buy your desired game pass without launching the game.
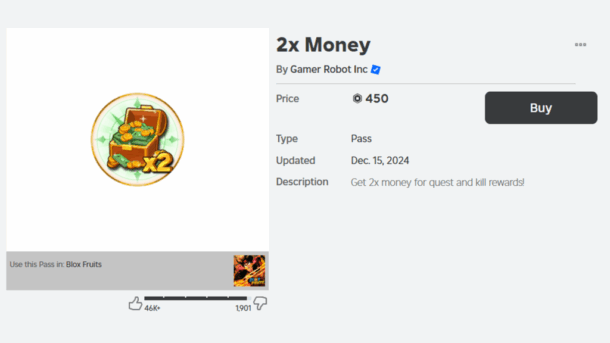
Game Passes – 2x Money
The 2x Money game pass doubles all Money earned from NPCs and Quests. It doesn’t affect chest rewards but maximizes earnings for players focused on combat and mission grinding.
This pass pairs well with questing strategies and NPC farming, making it a powerful tool for efficient Money earning. Players looking to earn money fast through active gameplay will find this especially valuable.

Defeating Enemies & Bosses
Enemies (NPCs) spawn in groups across different areas, providing steady Money drops when defeated. While regular enemies offer little rewards, bosses offer substantially higher Money and EXP.
Sea 1 introduces starter bosses like Gorilla King and Yeti, while Sea 3 features powerful ones like Stone and Hell’s Messenger. Your earnings scale with boss difficulty.
It is always recommended to equip strong fruits like Dragon or Kitsune for Boss farming. These premium fruits maximize your damage output and survival, leading to faster kills and more Money.
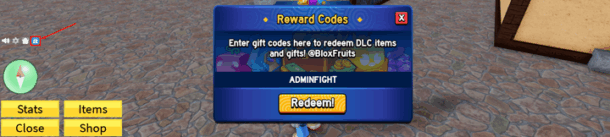
Redeeming Codes
Codes offer a simple path to free Money, though they require patience and timing. Developers give them away through social media, Discord servers, and in-game notifications.
To redeem simply click the gift icon on the left side of your screen and enter your code. While most codes grant EXP multipliers, some provide direct Money rewards. Check official channels regularly for new code releases.
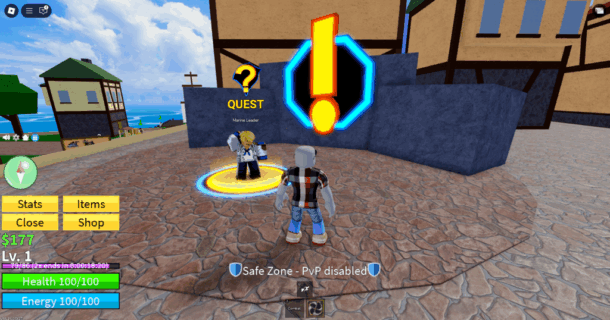
Quests
Quests provide steady Money while advancing your character. They scale in difficulty and reward as you progress. Each quest has a level requirement you must meet before accepting. Early quests might ask you to defeat a few NPCs for hundreds of Money. Later quests demand more challenging tasks but pay thousands. This makes questing an efficient way to earn while naturally leveling up.
Final Words
Money is your progression in Blox Fruits. Whether you choose to purchase it with Robux, farm bosses, complete quests, use codes, or combine multiple methods, consistent effort pays off. Pick the strategy that matches your playstyle and resources, then stick to it. The path to earning money is clear, you just need to choose your method.
As players accumulate wealth and unlock their desired fruits and equipment in the game, fans can express their love for the game by creating Neon Signs, bringing the unique aesthetics of Blox Fruits into their own rooms.
Fans can customize Blox Fruits-themed neon lights, replicating classic fruit silhouettes from the game or recreating the iconic combination of coins, swords, and fruits. Using bright, retro neon lights, they can capture the passion and fun of the game in a real-world setting.
Social Games
Ping, Not Panic: A Canadian Gamer’s 2025 Travel Stack – Steam Deck & Switch Updates, Remote Play, Con Wi-Fi Triage, and Instant Data Abroad

You’ve cleared security at YYZ with a backpack full of cables, a Steam Deck, and a wish to dodge Day-0 patch hell. Across the ocean, a con queue snakes past a venue that’s already melting its Wi-Fi. The goal is simple: play more, fiddle less. This field-tested guide gives Canadian gamers a clean travel stack—latency expectations, handheld tuning, hotspot etiquette, and a data setup that just works when you land.
Latency 101 (Know Your Ceiling Before You Chase Frames)
You can’t beat physics, but you can plan around it. Treat latency like weather: check it, adapt, win anyway.
Practical targets on the road
| Use Case | Target RTT | Bitrate Tip | Notes |
| Cloud gaming (Stadia-like/GeForce NOW) | ≤ 40–60 ms | 10–25 Mbps | Best in major metros; hotel Wi-Fi often too spiky |
| Remote Play (PS/Xbox → hotel/phone) | ≤ 60–80 ms | 5–12 Mbps | Cap at 720p/30 for reliability |
| Online shooters (native on handheld) | ≤ 40–70 ms | 3–6 Mbps | Prefer mobile data over café Wi-Fi |
| MMO/Co-op (native) | ≤ 70–120 ms | 1–3 Mbps | Slight input float is survivable |
Rule of thumb: In crowded venues, mobile data beats venue Wi-Fi for stability. Save giant downloads for hotel fiber; use cellular for sessions and comms.
Connectivity in 3 Minutes (No Kiosk Drama)
Skip airport SIM lines and roaming roulette. Install a travel eSIM at home so Discord, Remote Play, and patch checks work the second you land.
How to set it up
- Buy a plan online; you’ll receive a QR code.
- On your phone: Settings → Cellular/Mobile → Add eSIM → scan → label it Trip Data.
- Set Trip Data as Mobile Data, keep your Canadian number for calls/SMS/2FA.
- Turn Data Roaming ON for Trip Data only. Test once, then toggle data off until touchdown.
Want a simple option you can activate in minutes? Compare and set up Holafly’s esim for travelers.
If data naps after landing: Airplane Mode 10 seconds → confirm Trip Data is active → Data Roaming ON (that line only) → quick reboot.
Device Playbooks (Steam Deck, Switch, Remote Play)
Steam Deck / ROG Ally (and handheld PCs)
- Patch discipline: On hotel Wi-Fi, queue updates manually. Avoid “auto update everything” at 8 p.m. when everyone’s streaming.
- Shader cache sanity: Pre-cache big titles before you fly; it saves battery, heat, and stutter.
- Proton/version pinning (Deck): If a game breaks, roll back to the last known-good Proton. Keep a note of your stable pair.
- Performance caps: Lock to 40–45 fps with a frame limiter + half-rate vsync; drop TDP to keep temps—and fans—civilized.
Nintendo Switch
- eShop regions: Pre-download; don’t count on regional eShop switching abroad.
- Cloud saves: Confirm sync for your travel titles; manual upload before leaving home.
- RF survival: Pair controllers in your hotel room, not on the show floor where Bluetooth is chaos.
Remote Play (PS/Xbox/PC streaming)
- Encode targets: 720p/30 at ~5–8 Mbps is “it just works” on the road. 1080p/60 is hotel-fiber territory.
- Controller input: Wired (USB-C) or 2.4 GHz dongles beat Bluetooth in noisy RF environments.
- NAT hiccups: If your home router gets stubborn, enable UPnP or forward the official Remote Play ports before you travel.
Power & Thermals (The Silent Boss Fight)
- GaN charger: A dual-port 45–65W brick keeps phone + handheld happy.
- Power bank: 20,000 mAh with USB-C PD (at least 30W out) will top up a Deck on trains and in queues.
- Right-angle cables: Friendlier for hands; fewer port mishaps.
- Heat management: Pop a slim kickstand and lift the back off fabric surfaces. In flights, cap brightness and fps to cut heat and whine.
Security & Accounts (No Lockouts, No Leaks)
- 2FA: Keep your Canadian SIM active for OTPs; data rides on eSIM.
- Password manager: Ensure offline vault access for those check-in moments with bad Wi-Fi.
- VPN judgment: Use it for banking; avoid it for services that geo-fence streams/games unless you know the rules.
- Captive portals: Accept the splash page on your phone first, then tether the handheld.
Con & Tournament Survival (Queues, Badges, Backups)
- Badge & ticket hygiene: Screenshot every QR into a “Tickets” album—basements kill signal.
- Backpack loadout: Hard case for handheld, microfiber cloth, tiny stand, spare microSD, earplugs (hotel AC), cable ties for field fixes.
- Comms: Pin a Discord channel for your squad; set slow mode so plans don’t vanish in meme spam.
- Filming etiquette: Ask before filming cosplayers or booths; offer to DM selects.
Data Options: Quick Compare for Travellers
| Option | Setup | Multi-Country | Cost Predictability | Pros | Cons | Best For |
| Carrier roaming pass | None | Limited | Low | Familiar | Pricey daily caps | One-city sprints |
| Airport SIM per country | Queue | No | Medium | Local rates | Time sink + SIM swap | Long single stay |
| Pocket Wi-Fi | Pickup/return | Yes | Medium | Shareable | Extra device/battery | Groups/teams |
| Preinstalled eSIM | ~3 min | Yes | High | Land connected; keep CA number | Needs eSIM phone | Most trips |
Packing List (Gamer Edition, Carry-On Only)
- Handheld + rigid case
- 20k PD power bank + dual-port GaN charger
- Two short USB-C cables (one right-angle), 1x USB-A adapter
- Travel router (optional) to tame hotel Ethernet/Wi-Fi
- Spare microSD (formatted and empty)
- Foldable stand, microfiber, mini cable ties
- Earbuds with foam tips (better isolation on planes)
- Compact multitool (check airline rules if in carry-on)
A 24-Hour “Fly-to-Queue” Timeline (Copy & Tweak)
- T-18h (home): Pre-cache shaders, update core games, verify cloud saves, download offline maps. Install eSIM, test, then toggle data off.
- Airport: Join captive portal on phone, then tether the Deck to check for critical hotfixes.
- Flight: Battery mode: 30–40 fps cap, low brightness, story games > shooters.
- Hotel check-in: Speed test. Queue big downloads now, not at 8 p.m. when everyone’s streaming.
- Con morning: Phone data on, Discord open, badge QR ready. Handheld in case; power bank 100%.
- Evening: Batch-export clips, upload on hotel fiber; schedule posts for Canada prime time.
Troubleshooting in 30 Seconds
- Lag spike mid-fight? Drop res to 720p/30, move off congested Wi-Fi to mobile data, or stand near a window.
- Packet loss on venue Wi-Fi? Forget the network; tether to your phone.
- Deck won’t charge while playing? Use a PD port capable of >30W and a certified cable; lower TDP/fps to stay net positive.
Final Save: Play More, Fiddle Less
Travel gaming works when you make latency predictable, power abundant, and data boring. Pre-patch at home, cap frames smartly, treat venue Wi-Fi as suspect, and land with connectivity already solved. Do that—and keep your crew aligned on Discord—and your next PAX, Gamescom, or Tokyo pilgrimage will be about games, not guesswork.

Does gaming society need a reboot? Many people think so, with current platforms viewed by newcomers as either a mass of impenetrable content, or a world of strange and unwelcoming cliques. Nerd Culture aims to change that with a welcoming, engaging and accessible platform where all are welcome, and everyone can build their own hub, both for online celebration of all things nerdy, and for getting together offline in real life.
From PC and video gaming to board games, cosplay to fandom across movies, games and media, all areas of nerd culture are celebrated in smaller, safer hubs — including fun distractions like word games that bring people together through shared geekiness.. Places for fans to create their own spaces or join ones they feel at home in.
Features of Nerd Culture
Nerd Culture was built by a small team who felt like most of us do when facing the wall of social pressure around anything we love. It offers:
Easy and advanced group creation and search, allowing members to create, find and build groups dedicated to topics and events of interest. Note that members need to be 18+ to sign up, with fan, content creator and business categories delineating a level of interest.
Forums help create thematic communities focused on whatever is popular or niche, but important to fans with adjustable chat and feed features to help share fan voices in a reasonably-sized gathering, without being swamped by bots, trolls and other agent provocateurs. To keep them out, smart user safety features allow for intuitive moderation, chat mute and reporting tools to ensure safe social experiences.
When in the society and forum of their choice, fans can use real-time secure messaging to discuss the latest news or opinions, and collaborate in real time. Privacy settings can be customized to a level users are happy with, with privacy and safety settings that let them control who sees their content.
As part of the offline features, fans can arrange meetups and event management to link up with like-minded hobbyists in the real world, with event scheduling to promote and manage real-world events.
Fans Benefit from Rewards
To encourage engagement, contributions, responsible behavior and society-building, users can level-up their status, earning rewards through a built-in XP system. They can earn points by starting discussions, organizing events and helping people fall in love with new and familiar hobbies, unlocking levels, achievements and real-world prizes as they go.
“It’s like leveling up by helping build the community and fostering real connections,” said Nerd Culture co-founder Steven Weingarth. “Creators and members can also gain Nerd Cred for being a community advocate, and that unlocks more than just bragging rights.”
Nerd Culture is free to join and use, helping to recreate the social community of popular topics before they become swamped by low-quality content and bots. Designed for and by fans of gaming, fandom culture and creative hobbies, Nerd Culture welcomes new friends, helps them dive deeper into favorite interests or explore new worlds.
By helping users connect, discover and adventure together, with intuitive tools to help build meaningful communities, there’s plenty to see and do both online, through voice and video calls with your new buddies, and through new friends out in the real world through meetups and hangouts.
About Nerd Culture
As the founders (six lifelong nerds) put it, our new social platform sets out to fix the most frustrating problem: Why is it so hard, even in giant cities like LA, to find people who share my niche interests?
“When I moved to LA, I was shocked by how difficult it was to find a D&D group. Sites upon sites, Discord invites, bouncing between Reddit threads and Meetup and Facebook groups” writes Co-Founder Steven Weingarth. “It felt like yelling into a void. So our team set out to build the platform we all wish existed — a single place to connect and share stories with people over the things we love.”
Whatever your experience, many of us have felt unwelcome or overwhelmed in one place or another. Nerd Culture aims to offer a welcome hand to the nervous, or a new platform that we can build to create a more welcoming space about the topics we love.
-
 Guides6 years ago
6 Proven Ways to Get more Instagram Likes on your Business Account
-
Mainstream11 years ago
BioWare: Mass Effect 4 to Benefit From Dropping Last-Gen, Will Not Share Template With Dragon Age: Inquisition
-
 Mainstream7 years ago
How to Buy Property & Safe Houses in GTA 5 (Grand Theft Auto 5)
-

 Guides2 years ago
Free Fire vs PUBG: Comparing Graphics, Gameplay, and More
-

 Guides1 year ago
50+ Free Fire ID and Passwords Login List (Giveaway) 2025
-
 Casual3 years ago
8 Ways to Fix Over-Extrusion and Under-Extrusion in 3D Printing
-

 Other2 years ago
Ajjubhai UID: Free Fire Details & Earnings
-

 Features2 years ago
Exploring Valorant eSports Stats: Unveiling the Metrics Behind Competitive Excellence