Guides
Nym’s Nightmare – Walkthrough [with Explanations]
INTRODUCTION
Nym’s Nightmare is another creative and good-looking Escape Games by Selfdefiant. I love all of his Escape games, as they are Logical, Creative and the Design is unique. His latest release, Nym’s Nightmare, is really easy, but there’s one tricky puzzle. Read on to find out ;)
WALKTHROUGH
NOTE: You see the Table on the right-side (Top-Right corner of the floor)? Take the MAP (white piece of paper), from the Table (near Bottom-Right corner) if you so desire. However, it’s NOT necessary. Especially not if you’re going to follow this Walkthrough :D
NOTE 2: The navigation Arrows are located on each side of the game. Down Arrow is located on the Bottom of the Game Screen, meaning, right above the Menu Bar, at the bottom of screen. The Left and Right Arrows are located on the Left and Right-side of the screen. The arrows are only Visible when they’re available!
Walkthrough:
1. Click on the Object with all those Shapes on it, on the Table (Right-side), to Zoom in. Note the order they’re placed. Also, notice that the first Shape, the Triangle, has 3 Edges, the Square has 4 Edges, the next Shape has 6 Edges, and the last one, the Square, 4 Edges! By doing this, we’ve actually discovered a code: 3464
2. Zoom out (click on Arrow, bottom of game screen), and then click on the Rectangle-Shaped Grey Code Box, left to the Door in the middle. Input the code we exposed previously, 3 4 6 4, and press the E button, in order to open the door – enter!
3. Move Left, and take the BROOM, near Trash Can on Left-side. Move Right, 3 Times. Look at the Middle-Top of the screen. Do you see the Key stuck up there? Well, use the Broom to push the key down. Once it’s fallen, and is idle on the ground, take the KEY. Move Left!
4. Notice the Stars’ Edges on the Wall, and their colors. BLUE = 5 Edges, GREEN = 6 Edges, RED = 8 Edges. Now don’t get your hopes up, because we haven’t generated a code by doing this, because this Code has another pattern. Move Left Twice :)
5. Look at the Top-Right Corner. Do you see the Rectangle-shaped, colorful objects up there? Notice the order they’re placed in, from Top to Bottom (Descending order), and also remember the Colored Stars with different edges from before. Well, the Colors of the stars, correspond to those Colorful Objects up there. Remember this order: RED – BLUE – GREEN – BLUE, and if you recall the number of edges of each of those colors, you can generate this code: 8 5 6 8 – Move Left (lol, watch out for the Trash Can)!
6. Click on the Code Box, which the Yellow Star on the wall is pointing at, to Zoom in. Do you see that the Digits in the Code Box are also placed from Top to Bottom, just like the object from previous step? Well, what are you waiting for, type, or rather click the digits to match this:
8
5
6
8
Once done, click on the Button, right below the last Digit, the most bottom one, in order to open the Box. Take SMALL COG, Zoom out (Arrow on Bottom), and Move Right 2 Times!
7. Click on the Panel, on the right-side of the Door in middle (looks just like the Code Box in its Top-most part), to zoom it in. Forget about the Code and Numbers on the Left-side for now, let’s just focus on the Circles and Arrows on the right.
You see the Circles and the Arrows, pointing in different directions? Let’s forget about the Line that’s connecting them together, cause that’ll just confuse you.
From LEFT to RIGHT:
Circle #1: It’s obvious that this one is DOWN
Circle #2: This is where everything gets confusing. Since the Arrow is on the RIGHT-side of the Circle, while the 3rd Circle is on the LEFT-side of its Circle, it means that the Arrow on this Circle, is not the 2nd in line, but the 3rd. It’s confusing, yeah, but think of the Dark-Grey Line that is connecting all of the Circles together, as a guide that shows that the correct order of a circle is from LEFT to RIGHT, and this can then be thought: the Left-side of a Circle is before the Right-side – and the Circles in the middle are pretty close to each other, if you remove the Connecting Line in your head.
Another Theory: Remove the Line connecting the Circles in your head (the Dark Grey one), and if you look closely, you can see that the Top-Middle Arrow pointing Right (Circle #3), is actually closer to the Left, than the Bottom-Middle one. So, if you can also remove the Circles in your head, and then look at the location of the Arrows from Left to Right, you can discover the code ;)
This Arrow is pointing LEFT!
Circle #3: This Arrow pointing RIGHT, is actually before the one on Circle #2. Look at the theoretical explanation above!
Circle #4: This is also obvious. It’s the last one, and pointing RIGHT
You can finally generate this code: DOWN, RIGHT, LEFT, RIGHT – Circle 1, Circle 3, Circle 2, Circle 4! Zoom out, by clicking Arrow on Bottom.
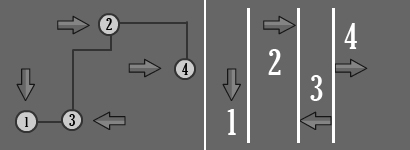
Possible Solution. The Circles and Lines may be an Illusion to distract the mind from seeing the Top Arrow before the Bottom one!
8. Move Left. Use the Silver Key in your inventory, on the Door in middle, to unlock it. Enter! Click on the Red Toolbox (Near Top-Left corner of the Floor), to zoom it in. Remember the Code we generated earlier, well, use it here. From LEFT to RIGHT: DOWN, RIGHT, LEFT, RIGHT, or click from LEFT to RIGHT, without touching the Arrows (all pointing UP), click them in this order: 2 Times, 1 Time, 3 Times, 1 Time!
Click on the Button, right below the Arrows, to open the Toolbox. Pick up the BOLT CUTTERS / HAMMER, Zoom out (Bottom-Arrow), and leave the room, by clicking on Down-Arrow!
9. Move Right, 3 Times! Use Bolt Cutters / Hammer, on the Lever, near Middle of the Wall ahead of you (the Lever with Red Handle). Take the BIG COG (The Black Circle-shaped object, which was spinning a few seconds ago, on the wall), and Move Left 3 Times!
10. Enter Door. You see the Machine right in front of you. Look at its most Top-Left part (the one that looks like the letter Y, with a big Cirlce). Place the Big Cog on the small Black Circle, in the middle of the Big Cirlce (which again is in the midle of the Y-shaped part of the Machine), and the Small Cog on the small Black Circle, which is located right below where you placed the Big Cog. Take the KEY, which just appeared, and leave the room by clicking on the Bottom-Arrow!
11. Move Right 2 Times. Use Black Key on the Door, to unlock it, and enter! You see all the Red Rectangle-shaped “Buttons” on the Machine. Well, click on them, to Active Power. Also, notice the 4 Lines and the Lines inside them, on the Monitor:
— = Long Line
– = Short Line
x = Nothing
Each Line has 3 Parts. In the First Part (Most left one), there can be a Long Line, a Short Line, or nothing. On the Second Part (Middle one), there can either be a Short Line, or nothing. In the Third Part (Most right one), there can either be a Short Line or nothing, just like the Second Part!
1. — x x
2. — – –
3. – x x
4. x – –
or
1. First Part: Long Line, Second Part: Nothing, Third Part: Nothing
2. First Part: Long Line, Second Part: Short Line, Third Part: Short Line
3. First Part: Short Line, Second Part: Nothing, Third Part: Nothing
4. First Part: Nothing, Second Part: Short Line, Third Part: Short Line
Remember this, and Leave the Room (Bottom-Arrow)!
12. Click on the Panel, Right-side of the Door (Looks similar to the Code Box, Left to the Door), to Zoom it in. For this Code, Focus on the Numbers on the Left-Side (forget about the Circle and Arrows). Find the Lines, that look just like the ones we saw in that Room on the Monitor, and remember, the Lines we found earlier, were placed in an Descending Order (Top to Bottom), so the code you find, the Top Line must be the first Digit:
1. — x x = 6
2. — – – = 3
3. – x x = 1
4. x – – = 5
or
1. First Part: Long Line, Second Part: Nothing, Third Part: Nothing
Number: 6
2. First Part: Long Line, Second Part: Short Line, Third Part: Short Line
Number: 3
3. First Part: Short Line, Second Part: Nothing, Third Part: Nothing
Number: 1
4. First Part: Nothing, Second Part: Short Line, Third Part: Short Line
Number: 5
Code: 6 3 1 5
————
Zoom Out (Bottom Arrow). Click on the Code Box, Left-side of the Door, to zoom it in. Type the code just found: 6315, and press E. Enter Door!
13. Enter the Door in the Middle. Move Right 2 Times. Move your Mouse/Cursor over the Dragons, and you’ll find out that each one has their own color in the Eyes. This time, it’s also a Descending Order, meaning that the Colors are in the order from Biggest/Largest to Smallest/Tiniest:
Biggest (Most Right-side): BLUE
Big (Most Left-Side): YELLOW
Small (Middle): GREEN
Smallest (Left to Middle): PURPLE
Code: BLUE – YELLOW – GREEN – PURPLE
Move Left 3 Times!
14. Open the Bottom-Drawer on the Small Table, next to the Sofa. Drag the Pieces of Paper, anywhere else on the screen, and take the LIGHTER. Zoom out (Bottom-Arrow)! You see the Painting/Picture, above the Sofa? Hold and Drag to the Right (Only Drag it as much as when you see 4 Colored Bars. Any further than its limit, may cause the Painting to follow the Cursor after releasing Mouse Button)! Change the Colored Bars, from LEFT to RIGHT, according to the Code we discovered: BLUE, YELLOW, GREEN, PURPLE
If you DON’T touch the Bars right after unveiling them, follow this, from LEFT to RIGHT:
Bar #1: Click 2 Times (BLUE)
Bar #2: Click 4 Times(YELLOW)
Bar #3: Click 7 Times(GREEN)
Bar #4: Click 0 Times(PURPLE)
Once Done, click on the Grey Button, near Bottom-Left corner of the 1st Bar, the most Left one. Take the DART, and Move Right!
15. Move Back (Bottom-Arrow). Enter Left-side Door (or Click on Left Arrow). Use Dart on the Balloon, in the Middle of Top-Left corner, and Top-Middle of screen, in order to pop it. Take the KEY that fell down. Also, notice the Level of the Position of the Bars on those Pipes:
From LEFT to RIGHT (There are only 3 Levels of Heights):
Bar #1: Top
Bar #2: Bottom
Bar #3: Middle
Bar #4: Top
Bar #5: Middle
Position: TOP, BOTTOM, MIDDLE, TOP, MIDDLE
Move Right, in order to leave the Room!
16. Enter the Door in Middle. Move Right! Click on the Code Box, next to the Door in middle, to Zoom in. Remember the Bars from the previous step, set the position of these Bars, as the position of the Bars in the other room, from LEFT to RIGHT: TOP, BOTTOM, MIDDLE, TOP, MIDDLE, or click them as following, without touching them from the beginning (all set on TOP), from LEFT to RIGHT:
Bar #1: Click 0 Times (TOP)
Bar #2: Click 2 Times(BOTTOM)
Bar #3: Click 1 Time(MIDDLE)
Bar #4: Click 0 Times(TOP)
Bar #5: Click 1 Time(MIDDLE)
Once done, press E, in order to open the Door. Enter!
17. Use the Lighter on the Candle (Middle Left-side of screen), and take the DIAMOND from where the Spider was. Move Back (Bottom-Arrow). Move Right, and insert Diamond on the small Diamond-shaped Spot, just below the Sword, on the stone. Once that is done, take the SWORD, and Move Left 2 Times!
18. Use White Key on Door, to unlock it, and Enter. Place the Sword on the Stone, at the Left-Corner of the Edge of the Cliff. Move Forward by clicking on the Opening in front of you (at the other end of the bridge). Move Left, and click on the 2nd Pumpkin from Left to Right, and quickly take the SCREWDRIVER from underneath it. Move Right!
19. Move Back 2 Times (Bottom-Arrow), and then Move Left. Use the Screwdriver on the Top Drawer of the Small Table, Left to the Sofa. Take the BEAKER (Glass used in Science/Lab), and zoom out (Bottom-Arrow)! Move Right, Enter Door, and Move Forward by enter the Opening on other side of Bridge. Now, Move Right!
20. Use the Beaker (Glass used in Science/Lab) in your inventory, on the standalone Pot. Click on the Plant’s Mouth, to make it open it. Take the KEY, and Move Left. Use the Plastic Key on the Door in front of you, and ESCAPE!
————-
WOW, this took me almost 2 Hours to finish o_O
Anyways, enjoy. Was it helpful?
Prid


Download Minecraft PE 1.21.131 APK for Android
Minecraft Bedrock 1.21.131 is a focused hotfix update — improved Spear combat, two important bug fixes, and better overall stability on Android. No new content, but a noticeably smoother experience.
Spear Knockback Improvement
The window during which a charged Spear attack can apply knockback has been extended. This makes combat feel more reliable — the attack now connects as expected without requiring pinpoint timing, especially useful when fighting multiple mobs at once.
Spear Animation Alignment
Charge attack animations now accurately sync with the Spear’s three gameplay phases: Engaged, Tired, and Disengaged. What you see on screen now matches what the game engine is actually doing — making combat more readable and reducing guesswork in fights.
Performance & Stability
Frame drops on mid-range Android hardware have been reduced. Memory handling improvements prevent sudden freezes during long play sessions. World loading and chunk generation are more reliable, reducing terrain “pop-in” when exploring or moving quickly.
Multiplayer Improvements
Backend updates improve session stability when players join or leave. Fewer disconnects and smoother synchronisation across Bedrock servers. Marketplace content and add-ons also load more consistently during multiplayer sessions.
Adventuring Time Achievement Fixed — The achievement no longer unlocks early. It now correctly requires visiting at least 17 biomes on PC, matching the intended design.
Marketplace Escape Key Fixed — Pressing Escape after using the Marketplace search now reliably returns players to the previous menu instead of getting stuck in a loop.
Add-on World Loading Fixed — A bug that triggered a “Block” error when loading or creating worlds with multiple add-ons installed has been resolved.
Download the APK
Tap one of the Download buttons above. Choose the Standard (no music) version if storage is limited, or the Full version for the complete experience. The ARM64 build is recommended for modern phones.
Enable “Install Unknown Apps”
Go to Settings → Security (or Privacy) → Install unknown apps. Enable the permission for your browser or file manager. Android requires this for any APK installed outside Google Play.
Open the APK File
Open your Downloads folder, find the Minecraft 1.21.131 APK, and tap it to launch the system installer. Follow the on-screen prompts.
Install Over Existing Version
In most cases you can install 1.21.131 directly over your existing Minecraft without losing any worlds or progress. If you see a signature conflict error, uninstall first — but back up your worlds beforehand.
Launch and Sign In
Open Minecraft, sign in with your Microsoft/Xbox Live account, and your existing worlds will load normally. Online multiplayer, Realms, and Marketplace content all work as before.
Download Minecraft PE 1.20 APK for Android
Get the full Minecraft Bedrock 1.20 (Trails and Tales) APK for Android. Supports Xbox Live sign-in. Multiple versions available — stable releases and preview builds.
Download the APK File
Tap the Download button above for the version you want. The APK file will save to your device’s Downloads folder.
Enable “Install Unknown Apps”
Go to Settings → Security or Privacy → Install unknown apps. Enable it for your browser or file manager. Android requires this for any APK installed outside of Google Play.
Open the Downloaded File
Open your Downloads folder (or tap the notification), find the Minecraft APK, and tap it to start the installer.
Confirm Installation
Tap Install and wait for the process to complete. If you see a “signature conflict” error, uninstall your existing Minecraft version first, then retry.
Launch and Sign In with Xbox Live
Open Minecraft, sign in with your Microsoft/Xbox Live account to access multiplayer, Realms, and cross-platform features.
Game mods have become an essential part of modern gaming culture. Short for “modifications,” mods are user-created additions or changes to video games that can transform everything from graphics to gameplay mechanics. They breathe new life into older titles, fix issues developers never addressed, and sometimes create entirely new experiences from existing games.
LyncConf has emerged as a leading platform in the modding world, serving as a central hub where gamers can discover, download, and manage high-quality mods safely. Unlike scattered forums or risky download sites, LyncConf organizes thousands of mods, verifies their safety, and connects talented mod creators with millions of players looking to enhance their gaming experience.
What Are Lync Conf Game Mods?
Lync Conf game mods are modifications to video games that alter or expand various aspects of gameplay, performance, visuals, or features. These can range from simple tweaks like changing a character’s outfit to massive overhauls that introduce entirely new storylines, worlds, or game mechanics.
LyncConf plays a unique role in the modding ecosystem. Rather than just hosting files, it acts as a trusted curator and organizer. The platform verifies mods for safety, checks compatibility across game versions, and provides detailed descriptions so players know exactly what they’re installing. This bridges the gap between creative mod developers and gamers who want reliable, quality content without the headache of searching through countless unreliable sources.
The evolution of game mods has been remarkable. What started in the 1990s as simple texture swaps and level edits has grown into sophisticated projects. Today’s mods include complete game conversions, professional-quality voice acting, complex scripting, and graphics that rival or exceed the original game’s production values. Some popular mods have even inspired official game features or spawned entirely new games.
FIFA 13 Career Mode Guide: Best Young Players
Why Gamers Choose LyncConf Mods
Gamers flock to LyncConf for several compelling reasons that set it apart from other modding sources.
The platform’s curation process ensures quality control. Every mod undergoes verification checks for malware, compatibility issues, and stability. This means you can download with confidence, knowing you won’t accidentally install something that crashes your game or compromises your computer’s security.
The benefits of using LyncConf mods are extensive. Visual enhancements can transform outdated graphics into stunning modern visuals with improved textures, lighting, and weather effects. Gameplay mods add new missions, quests, weapons, characters, and entire storylines that extend a game’s lifespan by hundreds of hours. Interface customization options let you tailor menus, HUDs, and controls to your personal preferences. Performance optimization mods can make games run smoother on older hardware or push newer systems to their limits.
Comparing modded games to their vanilla (unmodded) versions reveals stark differences. A vanilla game offers the developer’s original vision, which can be excellent but eventually becomes familiar and limiting. Modded games, however, offer nearly unlimited variety. You can adjust difficulty levels precisely to your skill, add quality-of-life improvements the developers never considered, fix bugs that were never patched, and keep the game feeling fresh years after release. Many gamers find that mods turn good games into great ones and keep them playing titles they might have otherwise abandoned.
Offline to Online: Engaging Games that Offer the Best of Both Modes
Top LyncConf Mods for Popular Games (2026)
Visual & Graphics Enhancements
Graphics mods remain among the most popular downloads on LyncConf. These transformations can make older games look modern or push new releases to photorealistic levels.
High-definition texture packs replace low-resolution game assets with crisp, detailed alternatives. Imagine playing a game from 2015 but with textures that look like they were made yesterday. Everything from character faces to building walls to natural landscapes gets the upgrade treatment.
Realistic weather and lighting improvements add atmospheric depth that dramatically changes how games feel. Dynamic shadows that shift with time of day, volumetric fog that rolls through valleys, rain that actually looks wet rather than like falling lines—these details create immersion that vanilla games often lack.
Popular examples include Fallout 4 ENB mods that transform the post-apocalyptic wasteland with cinematic color grading and lighting. Skyrim weather systems like “Vivid Weathers” make each climate region feel distinct and alive. Cyberpunk 2077 receives 4K enhancement packs that sharpen every neon sign and rain-slicked street in Night City, making an already beautiful game absolutely stunning.
Gameplay Overhauls
While graphics get attention, gameplay mods often provide the most lasting value by fundamentally changing how games play.
Mechanics overhaul mods reimagine core systems. Combat might become more tactical and challenging, with enemies that dodge, flank, and coordinate attacks. Crafting systems might expand to include hundreds of new recipes. Survival elements could add hunger, thirst, and temperature management to games that never had them.
New weapon types, armor sets, and equipment vastly expand player options. Rather than choosing from 20 weapons, you might have 200, each with unique properties, upgrade paths, and visual designs. This variety keeps gameplay fresh through multiple playthroughs.
Smarter AI transforms how games challenge you. Enemies that learn from your tactics, allies that actually help effectively, and NPCs with more realistic behaviors make game worlds feel alive rather than scripted.
Balanced progression systems fix common issues where games become too easy or grindy. These mods adjust experience curves, loot drops, and difficulty scaling so you’re always appropriately challenged without frustration.
Top 10 Sports Games To Play On PC and Consoles
Editor’s Picks — Most Downloaded Mods
Based on LyncConf’s 2025 download statistics, here are the community favorites:
The Witcher 3: HD Reworked Project (graphics overhaul with 12 million+ downloads)
Skyrim Special Edition: Legacy of the Dragonborn (museum and collection mod with massive content additions)
Fallout 4: Sim Settlements 2 (transforms settlement building with autonomous NPC-driven towns)
Minecraft: Create Mod (adds industrial machinery and complex engineering systems)
Stardew Valley: Stardew Valley Expanded (doubles game content with new locations, characters, and storylines)
Grand Theft Auto V: NaturalVision Evolved (photorealistic graphics transformation)
Dark Souls III: Cinders (complete gameplay overhaul with new classes, spells, and balanced difficulty)
How to Install Lync Conf Game Mods Safely
Installing mods might seem intimidating at first, but following proper steps ensures a smooth, problem-free experience.
Choosing the Right Mod Manager
Mod managers are essential tools that organize your mods, handle installation, and prevent conflicts. Don’t try to install mods manually by dropping files into game folders—that path leads to chaos.
Vortex is beginner-friendly with an intuitive interface. It automates most processes and works with numerous games. It’s the best starting point for newcomers to modding.
Mod Organizer 2 (MO2) offers advanced features for experienced users. It creates virtual file systems so mods never actually overwrite game files, making it easier to troubleshoot issues and switch between mod setups.
CurseForge specializes in games like Minecraft and World of Warcraft, with streamlined one-click installations for supported titles.
Choose based on your experience level and which games you’re modding. Most serious modders eventually use different managers for different games.
Harmonicode Gaming: Revolutionizing Performance and Player Experience
Installation Steps
Step 1: Download and Install Your Mod Manager
Visit the mod manager’s official website, download the installer, and follow the setup wizard. Most managers will automatically detect your installed games.
Step 2: Create a Mod Profile
Profiles let you maintain different mod setups. You might have a “vanilla plus” profile with just graphics improvements and a “full overhaul” profile with gameplay changes. This prevents conflicts and lets you switch between experiences easily.
Step 3: Download Mods from LyncConf
Browse LyncConf’s catalog, read mod descriptions carefully, and check the “Requirements” section. Click the download button, which will typically offer a “Download with Mod Manager” option that automatically adds the mod to your manager.
Step 4: Check Dependencies and Compatibility
Many mods require other mods to function. Your mod manager usually highlights missing dependencies. Install these first, then activate your desired mod. Also check the mod’s compatibility notes—some mods conflict with others and shouldn’t be used together.
Step 5: Arrange Load Order
Load order determines which mods take priority when multiple mods change the same game elements. Your mod manager provides tools to arrange this, and many have automatic sorting features.
Step 6: Launch and Test
Start your game through the mod manager (not the normal game launcher). Test that everything works as expected. If issues arise, you can disable mods one at a time to identify the problem.
Troubleshooting Common Issues
Load Order Problems: If certain mods aren’t working or you’re experiencing crashes, the load order may need adjustment. Tools like LOOT (Load Order Optimization Tool) can automatically sort mods into optimal order for many games.
Dependency Conflicts: Sometimes two mods try to change the same game file in incompatible ways. Check mod descriptions for known conflicts, and when in doubt, disable one of the conflicting mods to see if that resolves the issue.
Missing Assets or Textures: This usually means a required dependency wasn’t installed. Re-read the mod description’s requirements section carefully and install any missing pieces.
Game Won’t Launch: Start by disabling all mods to ensure your base game works. Then enable mods in small groups to identify which one causes the problem.
Where to Get Help: LyncConf’s community forums are excellent resources. Most mods also have comment sections where users share solutions. Reddit communities dedicated to specific games or modding in general (like r/modding) provide helpful troubleshooting support. Many games also have Discord servers where experienced modders answer questions in real-time.
Essential Tools & Platforms for Modding
Beyond mod managers, several specialized tools make the modding experience smoother and more stable.
LOOT (Load Order Optimization Tool) automatically sorts your mods into the optimal load order based on a master list maintained by the modding community. It prevents conflicts and ensures mods load in the correct sequence. Essential for games like Skyrim or Fallout with dozens of mods.
xEdit (also known as SSEEdit, FO4Edit, etc., depending on the game) lets you view and edit game files to resolve conflicts between mods. Advanced users can merge mods, clean dirty edits, and create compatibility patches.
ENB Manager helps you organize and switch between different ENB presets (advanced graphics mods). Instead of manually swapping files, you can change your entire visual setup with a few clicks.
SKSE, F4SE, and Other Script Extenders expand what mods can do by adding new scripting functions. Many advanced mods require these as dependencies. They’re safe community tools that have been thoroughly tested.
BodySlide and Outfit Studio let you customize character body and clothing models. Useful for games where appearance matters and you want everything to work together visually.
BethINI optimizes game INI configuration files for better performance and stability, particularly helpful when running many graphics mods.
These tools might seem excessive at first, but as you get deeper into modding, they become invaluable for creating stable, personalized game experiences.
Community & Collaboration
The modding community represents one of gaming’s most creative and collaborative spaces, and LyncConf serves as a major gathering point for this community.
LyncConf’s forums host thousands of discussions where modders share techniques, troubleshoot issues, and announce new projects. You’ll find guides written by experienced users, feedback threads for mods in development, and showcase areas where creators present their work.
Discord servers connected to LyncConf provide real-time communication. Whether you need quick help with an installation problem or want to chat with others who share your passion for a particular game, these communities offer immediate support and camaraderie.
Reddit threads like r/LyncConfMods (if available) aggregate news, showcase impressive mod combinations, and provide another avenue for discussion. Many individual games also have their own modding subreddits where LyncConf content gets shared and discussed.
For aspiring mod creators, LyncConf offers pathways to recognition and support. The platform lets you submit your own mods for review and publication. Successful creators gain exposure, receive donations from appreciative users, and sometimes even attract attention from professional game studios. Many professional game developers started as hobbyist modders.
The collaborative spirit extends to mod compatibility projects, where creators work together to ensure their mods function well alongside others. Translation teams localize mods for different languages. Testing groups volunteer to find bugs before public release. This cooperative approach benefits everyone in the ecosystem.
Latest Updates from LyncConf (2025)
LyncConf continues evolving with new features that make modding more accessible and reliable.
Automated Conflict Detection now scans your mod list before installation and warns about potential incompatibilities. This AI-powered system checks against a database of known conflicts, saving you from game-breaking combinations.
Smart Install Suggestions recommends complementary mods based on what you’ve already installed. If you download a graphics overhaul, the system might suggest compatible lighting mods or performance optimizers that work well together.
Enhanced Patch Notes now appear directly in the mod manager, showing exactly what changed between versions. This transparency helps you decide whether to update immediately or wait for further stability improvements.
Version Compatibility Guidance automatically checks which mods work with your current game version. When games update, this feature prevents you from installing outdated mods that might cause crashes.
2025 Roadmap Highlights reveal exciting developments coming soon:
Cross-Platform Syncing will let you access your mod profiles across multiple devices. Start modding on your desktop, then continue tweaking your setup from a laptop while traveling.
Console Support Expansion aims to bring more PC mods to console versions where possible, working within console manufacturers’ restrictions. While consoles will never have the freedom of PC modding, LyncConf is pushing to maximize what’s available.
Creator Monetization Tools will help mod developers earn sustainable income through optional supporter subscriptions, similar to Patreon but integrated directly into the platform.
VR Mod Optimization specifically flags and optimizes mods for virtual reality gaming, ensuring compatibility with VR hardware and controllers.
FAQs
Can LyncConf mods be used on consoles?
Limited options exist for consoles. Xbox and PlayStation have built-in mod support for certain games, but these use restricted versions with fewer capabilities than PC mods. LyncConf primarily focuses on PC modding, though they’re working to expand console compatibility where manufacturers allow it. Check individual game pages for console-specific mod availability.
Are these mods safe?
LyncConf implements rigorous safety checks on all hosted mods. Each file undergoes virus scanning, code review for malicious content, and community reporting systems. While no platform can guarantee 100% safety, LyncConf’s verification process makes it one of the safest sources for game modifications. Always download from official LyncConf links rather than third-party mirrors.
How does LyncConf compare with other mod platforms like Nexus Mods or Steam Workshop?
Each platform has strengths. Nexus Mods offers the largest overall library and has been around longest, making it the go-to for certain games. Steam Workshop provides seamless integration with Steam games through one-click installations. LyncConf differentiates itself through superior curation, advanced conflict detection, and a more modern interface. Many experienced modders use multiple platforms—Nexus for variety, Steam Workshop for convenience, and LyncConf for curated quality and safety. They complement rather than compete with each other.
Do mods disable achievements?
This depends on the game. Some games disable achievements when any mods are detected. Others allow mods without penalty. There are also achievement enabler mods for many games that restore achievements even when using modifications. Check your specific game’s policies and look for achievement-related mods on LyncConf if this matters to you.
Will mods break when my game updates?
Sometimes. Major game updates can make certain mods incompatible, especially those that rely on script extenders or modify core game files. LyncConf’s version compatibility system helps prevent these issues by warning you before installing outdated mods. When your game updates, check mod pages for updated versions before launching with your full mod list.
Can I use LyncConf mods alongside mods from other sources?
Yes, but carefully. Mod managers can handle files from multiple sources. However, ensure mods don’t conflict regardless of their origin. Read compatibility notes, check for duplicates, and test your setup thoroughly. The automated conflict detection helps identify issues across all your mods, regardless of source.
Conclusion
LyncConf game mods represent the cutting edge of player-driven gaming innovation. By providing a safe, organized, and community-focused platform, LyncConf makes the world of game modifications accessible to everyone from curious beginners to veteran enthusiasts.
The value proposition is clear: transform your gaming library into something uniquely yours. Fix that one annoying bug developers never addressed. Add hundreds of hours of new content to your favorite game. Make a decade-old title look and play like it launched yesterday. Connect with a passionate community of creators and players who share your interests.
Whether you’re looking to enhance graphics, overhaul gameplay, or simply make your gaming experience more convenient, LyncConf offers curated, verified mods that deliver results without the risks associated with unverified sources.
For gamers in 2025, the question isn’t whether to use mods—it’s which incredible modifications you’ll try first. With LyncConf’s comprehensive catalog, intuitive tools, and supportive community, you’re equipped to dive into the limitless possibilities of modded gaming. Your games will never be the same, and that’s exactly the point.
-
 Guides6 years ago
6 Proven Ways to Get more Instagram Likes on your Business Account
-
Mainstream11 years ago
BioWare: Mass Effect 4 to Benefit From Dropping Last-Gen, Will Not Share Template With Dragon Age: Inquisition
-
 Mainstream7 years ago
How to Buy Property & Safe Houses in GTA 5 (Grand Theft Auto 5)
-

 Guides2 years ago
Free Fire vs PUBG: Comparing Graphics, Gameplay, and More
-

 Guides1 year ago
50+ Free Fire ID and Passwords Login List (Giveaway) 2025
-
 Casual3 years ago
8 Ways to Fix Over-Extrusion and Under-Extrusion in 3D Printing
-

 Other2 years ago
Ajjubhai UID: Free Fire Details & Earnings
-

 Features2 years ago
Exploring Valorant eSports Stats: Unveiling the Metrics Behind Competitive Excellence
Calin Ciabai
March 29, 2011 at 11:11 am
Great walkthrough, Prid! It’s really nice to see your magic back to work, it is a complete and really helpful walkthrough!