iOS Games
The Room Two Walkthrough: Chapter 2 Solution

We are back with the walkthrough for The Room Two and this time we’re moving to the Chapter 2 of the game where a new room awaits and more puzzles are to be solved. In case you get stuck along the way, we are here to help with the step by step instructions on how to complete the game, so check out below The Room Two walkthrough for chapter 2.
Don’t forget that we have already solved the first chapter and you can check it out here. Now let’s move on with the instructions on how to complete Chapter 2 in The Room Two!
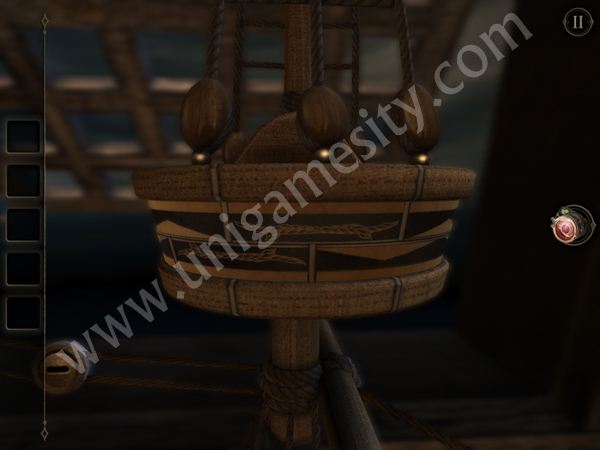
Zoom in to the ship on the table. Double tap the note to read it. Now zoom in to the crow’s nest to the right of the ship and rotate the top and bottom parts until you see the ropes. Arrange them one under the other and you will get a key:
Zoom out and back into the cannons. Drag the right one to the other position (down, left, down) and do the same with the left one: drag it left, swipe it left to turn, then drag down:

Use the key with the key hole and swipe open the side of the ship. Zoom in to the letter to read it, then zoom in to the other side. Take the strange shaped key and slide the red jewel all the way to the right.

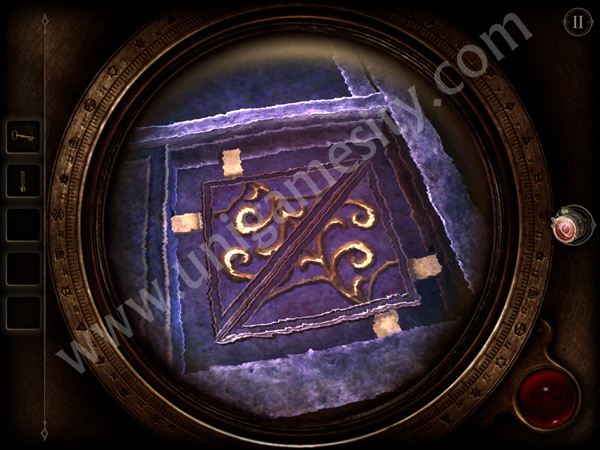
A new area appears, with a chest. Tap the wooden beam behind the chest and you will see an easy puzzle – you simply have to rotate the left and right circles to free the middle thingie and get the key:

Zoom out and you will see near the chest a notebook you can read. Tap on the side of the chest and lift that handle up to get a strange cylinder:

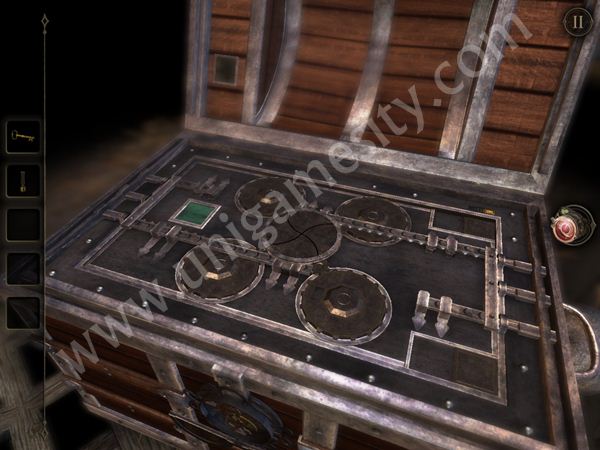
Now zoom into the front of the chest, and we have to open the lock. You have the solved puzzle below:
Swipe the key and open the chest. Now we have a series of sliders that we have to open:
First, put on your eyepiece and zoom into the one to the left. Simply swipe that middle item to the left so that the bars are pushed back. This will open a piece in the middle:

Now zoom in to the top right corner and drag the top switch to the left. Put the eyepiece on and solve the new puzzle. Drag the bottom and left bars, then swipe the middle object to the left so that the new bars fill it. A new piece of the middle puzzle opens:

With your eyepiece on, zoom in to the square on the chest’s top, to the left and drag those pieces away:
Now zoom in to the bottom right circle of the mechanism and tap the yellow button. The bottom right square will open and you have to drag the sides of the square (with your eyepiece on) to the sides:
Tap the strange cylinder. You will notice that it has some handle-like things to the sides. Turn it left or right and raise these handles up:

Now drag the cylinder in the middle of the chest that we have just unlocked and swipe left to open the chest. Swipe up and read the letter:

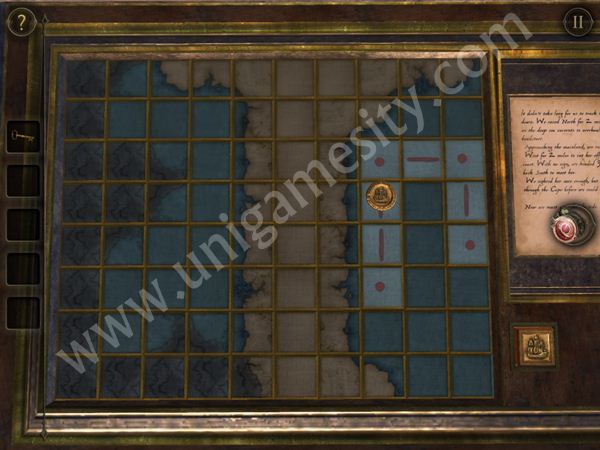
The letter tells us how to move the piece on the map: 2 up (Norht), 2 left (West) and 3 down (South). So zoom into the map and move the piece as indicated. Now tap the button under the letter and the ship will move:
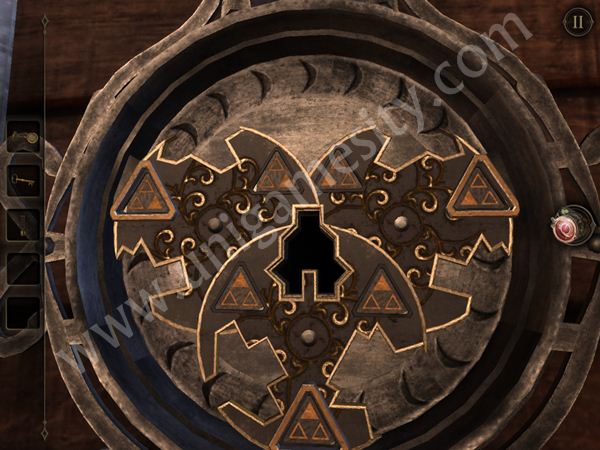
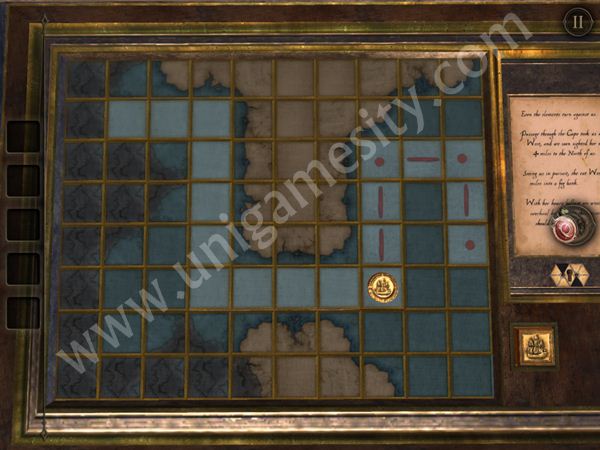
Now zoom into the new letter. There is a new set of instructions that tells us to go 4 left, 4 up, 2 left. But before we use them, we must zoom in to the keyhole under the diary and solve that puzzle:

In order to solve the puzzle, first move up the circle triangle two times, move the pieces from its side right and move the circle to the left. Now move the square all the way to the left until it gets into its place. Finally, just drag the circle on top and use the key there.
Now it’s time to solve the new puzzle on the map:
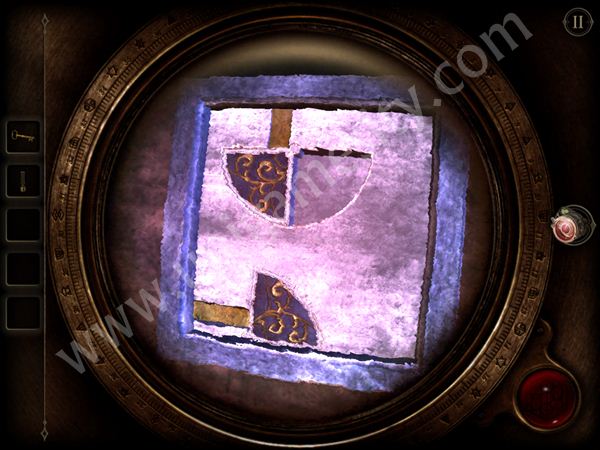
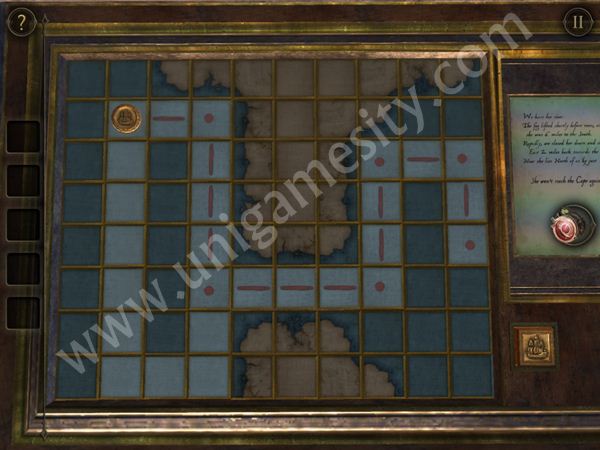
A new diary entry! This one tells us that we have to move 6 down, 2 right, 1 up. Now put your eyepiece on and it’s time to solve the ship puzzle:
In order to solve it, simply drag the ship’s wheel all the way to the right and keep it that way until the bottom of the puzzle appears. When it does, release and match the top with the bottom. The new part of the water appears, and we have to follow the directions:
Take the figurehead and go back to the ship and place it on the front of it:

A new part of the ship opens and you can take a wheel. Move to the back of the ship and place it there. Turn it all the way to the right and a new compartment will open. Drag that piece all the way to the right and a new wheel will appear on the ship:

Turn that wheel all the way to the right too and a code will appear at the bottom of the ship. Now to see what we have to write there, zoom out a little to see the entire ship and war the eyepiece. Here’s the code (ROSE):
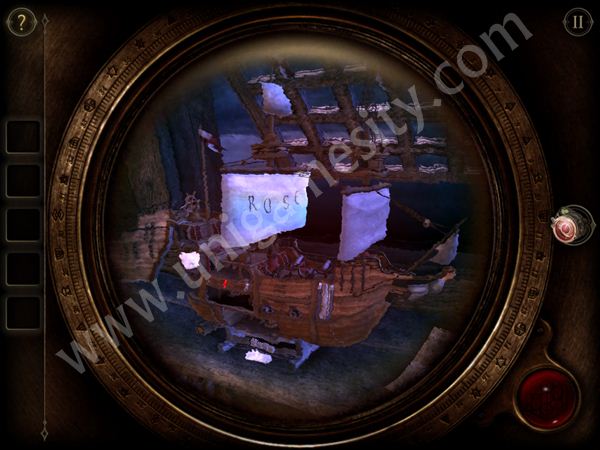
Now insert that code on the bottom and pick up the red gem. Place it on top of the ship and drag it to the left.

And a new area appears. Stay tuned with us as we’ll continue the walkthrough for The Room Two, Chapter Two soon in a new article!
[UPDATE] We have finally managed to complete the second chapter and you can check out the walkthrough here for the rest of the level!


Since most Canadians prefer playing casino games on their smartphone, online casinos have optimized their sites to ensure you have a seamless gaming experience. Moreover, some sites now have dedicated apps for Android and iOS. These apps are optimized to ensure the graphics and visuals remain unchanged regardless of the screen size. In this article, we will discuss some of the casino games you can play on your iPhone either via the iOS app or using a mobile web browser such as Safari.
How to Choose an iPhone Casino
While most casino sites today are optimized for mobile devices, not all iPhone casinos provide the same level of service, game variety, or reliability. To ensure a positive experience, Canadians should keep several key factors in mind when selecting a mobile casino.
Licensing is the first and most important consideration. Make sure the platform is legally registered with a recognized authority, such as the Kahnawake Gambling Commission or iGaming Ontario. These regulators enforce standards that protect players and ensure games are fair.
The selection of games is another critical factor. A strong mobile casino should feature a broad mix of options, including online slots, live dealer tables, and specialty games. Games developed by trusted providers like NetEnt, Microgaming, or Playtech usually come with better visuals, faster gameplay, and a more trustworthy reputation.
Bonuses often come in handy, especially if you are looking to boost your account. However, some offers have strict terms and conditions. Look for casinos that provide generous bonuses with transparent and reasonable wagering terms. Regular offers like reload bonuses, free spins, and loyalty rewards also enhance the gaming experience.
Reliable customer service is essential, especially when it comes to resolving technical issues or questions about withdrawals. The best iPhone casinos offer 24/7 customer support through live chat or email, ensuring assistance is always within reach.
Best Casino Games for iPhone in 2025
iPhone users in Canada have access to a wide selection of high-quality real-money games. These games are optimized to work seamlessly on iOS, delivering responsive touch controls, HD visuals, and fast loading times.
Online slots are among the most popular game categories available to iPhone users. With thousands of themes to choose from, players can go on mythical adventures, visit ancient civilizations, or enjoy modern action-packed storylines. Game types range from simple three-reel machines to feature-rich five-reel titles with dynamic paylines, multipliers, and bonus rounds. Many also come with high Return to Player (RTP) rates and the chance to win progressive jackpots.
Many Canadians also take advantage of free slots offered by mobile casinos. These demo versions allow you to try out games without spending real money. The gameplay, bonus rounds, and features are the same as in the full versions, making them ideal if you want to learn the rules or simply want to play for fun with no risk. Free slots are a great way to try new titles before deciding to wager real funds.
Roulette is another favorite among Canadian players. Whether you’re spinning the wheel on an RNG-based game or interacting with a live dealer, iPhone apps provide a realistic casino experience. RNG versions rely on certified algorithms to ensure fairness, while live dealer games allow real-time interaction with professional croupiers. Popular options include European Roulette, Premium French Roulette, and Immersive Roulette.
Blackjack also ranks high on the list of top iPhone casino games. The goal in this game is to get a hand value closer to 21 than the dealer without going over. Mobile blackjack titles often feature polished interfaces and variations that adjust rules and odds slightly. Multi-Hand Blackjack and Atlantic City Blackjack are well-suited for both beginners and seasoned card players.
Baccarat is another excellent choice for iPhone users who enjoy card-based games with simple rules. It involves predicting whether the banker’s hand or the player’s hand will be closest to a total of nine, or if the round will result in a tie. Both live dealer and virtual baccarat games are available in Canadian iPhone casinos, often with flexible betting ranges to accommodate all player types.
Poker enthusiasts are not left out. Many iPhone casinos feature a solid lineup of video poker titles, such as Jacks or Better and Deuces Wild. These games mix strategy and speed, offering single-hand and multi-hand options along with bonus features.
How to Choose an iPhone Casino
To find the best iPhone casinos, it is advised to test several sites to ensure they meet your preferences. Start with a background and security assessment. Verify the casino’s licensing credentials, partnerships with software providers, and the use of SSL encryption for data protection. This ensures the platform is safe for real money play and secure when handling sensitive information.
Next, test the deposit process. This will help you understand how fast and smooth the transaction is. Additionally, check the available payment methods, including cards, e-wallets, and crypto, as this will give you flexibility to select the most convenient option.
After you’ve deposited, explore the casino’s game library. The best iPhone casinos offer a range of games, including popular slots, table games, and live casino games. Also, test the compatibility of these games on your iPhone to confirm that all games load properly and perform without lag or glitches.
Customer service is another key aspect to consider. You can contact the support team through available channels to check response times and overall helpfulness. This step is critical, especially if you run into issues with payments or gameplay.

Horse racing is a globally spread sport with billions of fans worldwide. The thrills of the races and the excitement of the betting make horse racing quite popular among adrenaline rush seekers.
However, unlike other sports like football or basketball that you can actually try in your backyard, becoming a racehorse rider is out of reach for most people. But all hope for our fellow race lovers is not lost and the gaming world comes to the rescue.
We are talking about horse racing simulation games where you can pick or breed your own horse, participate in online racing tournaments, earn prestige, take care of your horse, and much more.
Horse racing video games are perfect when it comes to getting the bigger picture of the sport and familiarizing yourself with other aspects apart from racing, like stable management, breeding, and finance management.
On top of that, horse racing video games can help you understand how the sport works, which may help you with the next bet you make on TwinSpires.
Fortunately, there are plenty of horse racing games for iOS, and in today’s article, we will highlight some of the best that you should try.
Rival Stars Horse Racing
This is a game made by a legendary horse race video game developer called PikPok and it is without a doubt one of the best horse racing games available for iOS right now.
The graphics look incredible for a mobile game. They are quite realistic, and the horse movement and the design of the tracks also give you the feel that you are participating in a real-world race.
Rival Stars Horse Racing has quite a fast pace, where you can complete some quests and upgrade your stable, but the focus is on the races, as it should be.
When we talk about the racing part of the game, every racetrack that you unlock offers something new. You get to race at different lengths and surfaces. But let’s focus on the important part, race mechanics.
You can steer the horse, brake, and activate their sprint ability. The horse’s performance is based on multiple factors such as ground consistency, position, race length, previous races, and much more.
Rival Stars Horse Racing also has a quite good breeding, training, and managing system. On top of that, there are many different horse coat colors and breeds. Unlike other games like Zelda where you can get a gold horse, Rival Stars Horse Racing focuses on realism. All of the horses have natural coat colors and traits.
You get to collect or breed horses, transform foals to feed, and upgrade facilities to unlock more options to progress.
The only thing that is missing from the game is the audience on the races since the race courses feel a bit empty with nobody around.
Horse Racing Manager 2024
This is a game that has a rather different approach than Rival Stars Horse Racing. It is focused more on the managing part of horse racing rather than on the actual gameplay and racing. You are in control of your business operation and your goal is to succeed in the world of horse racing and earn money.
You don’t have an impact on the races, and you cannot control your horse. The races are simulated, and the outcome depends on your horse’s stats and abilities.
That’s why horse training, and breeding a champion horse play a really important role in the game.
The best thing about Horse Racing Manager 2024 is the ability to race online. There are live PVP races that occur every 5 minutes and everyone can participate in them.
This is the perfect game if you want to learn what’s happening behind the curtains of horse racing as a sport. You are in control of your breeding rights that you can sell, as well as the age and career path of your horse.
It is an interesting game, especially for those who are not afraid of data and analysis.
iHorse Racing
This is a similar game to Rival Stars Horse Racing but with worse graphics, and fewer options. This game has multiple features like horse training, stable management, horse auction, race entries, CLU-jockey hiring system, and world jockey ranking, and you can connect your Facebook profile to invite friends.
To be honest, the graphics and gameplay of the game are fun and engaging, but I’d still go for Rival Stars Horse Racing, especially if you like a more realistic horse racing game.
Pocket Stables
Let’s drop down all the realism and focus on some retro 2D gameplay. For all retro game lovers who have a passion for horse racing, Pocket Stables is just the perfect game. At first glance, this game might look simple, but it actually has many features that make it even more fun.
For starters, you can build training facilities where you can increase your horse’s stats. Additionally, not all horses are the same and your goal should be to find a horse with the right balance of speed, stamina, and intensity.
As you win races, you’ll receive prizes, that can be used to upgrade your stable and give you better ways to breed a faster horse.
It’s fun, casual, and quite cute. Plus, you get to build your horse racing community and hire people that will take care of your stable.

It’s crazy to think mobile games started with super basic stuff like Snake on old-school Nokia phones. Now, thanks to touchscreens and motion sensors, playing games on our phones feels more immersive than ever. Whether it’s swiping to cast spells, tilting to steer race cars, or just furiously tapping buttons, mobile gaming has come a long way from static keypads of the past.
How It Was
In the beginning, little keypads were the only controls we had to work with. Remember playing Brick Breaker on their BlackBerry, anyone? Then, the accelerometer changed everything. Suddenly, we could just tilt our phones to do all kinds of things like aim angry birds, balance stacks of blocks, even steer cars in racing games. Way better than pressing little arrows!
Of course, as screens got more advanced, mobile games exploded into all kinds of genres, from puzzles to 3D adventures. Multitouch displays, in particular, are what really enabled natural feeling gesture controls.
Swiping Changes the Game
These days, swiping is easily one of the most common ways we interact with mobile games. You’ll find it everywhere, from temples you raid in endless runners like Temple Run to baseball diamonds when batting in MLB Tap Sports Baseball. Swiping not only feels super intuitive but also adds velocity and immediacy, perfect for fast-paced games.
Even slower-paced games use swipes for all kinds of game mechanics, like directing troops across battlefields in strategy games such as Clash of Clans. No matter the genre, swiping works because it feels so smooth, direct, and responsive. Not to mention, it’s just plain fun!
Tapping into Gameplay
Tapping will always be one of the best ways we can interact with phones. After all, it’s how we click links, type messages, and snap pics. For gaming, taps are perfect for delivering pinpoint precision. There’s nothing quite as satisfying as nailing a perfect note streak in games like Piano Tiles by tapping right on the beat.
You’ll also find that tapping makes snappy navigation through menus and UI thanks to its accuracy and responsiveness. Most games use taps for activating fundamental stuff like making your character jump, shoot, or interact with objects in the game world. It’s just so reliable!
Hypercasual games, in particular, thrive on simple yet addictive tap mechanics around sorting colors, popping bubbles, merging objects, and the like. When gameplay boils down to pure interactivity, nothing beats good old-fashioned screen tapping.
Getting Physical with Motion Controls
Phones now pack all kinds of motion sensors that track positioning and tilt along multiple axes. It allows for a myriad of gesture controls that add physicality and mimic real actions. For example, you can cast a line by flicking your phone while fishing in Ridiculous Fishing. Steering vehicles in racing games feels super tactile by tilting your phone to control direction. Even party games get in on the action with shaking or wiggling gestures detecting your phone’s movements.
Anything that gets us moving beyond just staring at the screen helps create moments of skill-based mastery. You feel much more engaged pulling off tricky shots in pool games by adjusting just the right angle or keeping teetering structures from collapsing with careful tilting. That sense of physical feedback goes a long way toward gameplay immersion.
Voice, AR, and Beyond
With phone cameras, mics, and sensors improving by the generation, we’re beginning to see radical new control schemes. Augmented reality transforms the world around you into a game environment like we’ve seen with monumental successes like Pokémon GO. Calling plays or audibling routes by literally yelling at your phone has also created hilarious moments playing Madden NFL Mobile. Heck, the camera can even scan objects to import them into games. The possibilities seem endless as technology progresses!
But with all these advancements, the most crucial thing developers can do is make sure their games remain accessible through difficulty settings, customizable controls, and assist modes. That way, anyone can tailor things to their personal playstyle and limitations. Gaming needs to be fun and inclusive for everybody, after all!
With new mobile games flooding app stores every single day, it feels risky trying out some random new title. That’s where special apps like Cash Giraffe come in handy. They actually give you money just for testing out new mobile games with no strings attached!
Where Are We Headed?
It’s anyone’s guess where things go next. Controllers are becoming more common to make mobile gaming feel console quality. Tools like Apple Pencil and Bluetooth styluses could let us draw playfields or game elements. New sensors might even track eye movements for hands-free control. The future is filled with possibilities!
For now, though, as long as developers keep innovating with intuitive tap, tilt, and swipe gestures, mobile games should have no problem staying fun and immersive. Just try not to smash your phone in celebration next time you pull off an epic comeback!
-
 Guides6 years ago
6 Proven Ways to Get more Instagram Likes on your Business Account
-
Mainstream11 years ago
BioWare: Mass Effect 4 to Benefit From Dropping Last-Gen, Will Not Share Template With Dragon Age: Inquisition
-
 Mainstream7 years ago
How to Buy Property & Safe Houses in GTA 5 (Grand Theft Auto 5)
-

 Guides2 years ago
Free Fire vs PUBG: Comparing Graphics, Gameplay, and More
-

 Guides1 year ago
50+ Free Fire ID and Passwords Login List (Giveaway) 2025
-
 Casual3 years ago
8 Ways to Fix Over-Extrusion and Under-Extrusion in 3D Printing
-

 Other2 years ago
Ajjubhai UID: Free Fire Details & Earnings
-

 Features2 years ago
Exploring Valorant eSports Stats: Unveiling the Metrics Behind Competitive Excellence