Featured
How to Start Your Own Gaming Blog from Scratch in Less than 30 Minutes

So, you’ve decided that you love gaming so much that you have to write about it? Then it’s time to start a blog!
In today’s article I’m going to teach you how to start a gaming blog, from scratch, in less than 30 minutes. Let me warn you: launching your gaming blog is the easy part! Getting your blog known to the masses and having all the AAA developers and publishers spamming your email with review requests and personal invitations to events is really difficult.
But we’re taking it one step at a time! And the most important step if you want to get there is launching your gaming blog. Best part? You don’t need any technical skills or experience blogging to get started!
Why learn from me when you’ve probably never heard about Unigamesity (or me) before?
Because in this extremely crowded niche, you probably haven’t heard of 90% of the people who are making a living from their gaming blog. Like me! I started blogging about computer and video games in 2008 before switching to a self employed, no boss to nag me, full time blogger in late 2009 when I launched Unigamesity.
I’ve wrote for or had my articles featured on, or linked to by respectable and well known websites (Softpedia, Games.com, Eurogamer, Gamerant, Slashdot, Heavy.com, Neowin, Neogaf, Neoseeker plus many, many more) and I managed to get peak audiences of over 2 million unique visitors to my blogs. Per month. I am making a living today out of this, so I definitely know a thing or two about this topic. And you might want to learn and do what I do.
So I have decided to help people who were just like me was when I started: clueless. And today we’re dealing with the most important part of your blogging career: getting your blog launched! So let’s not waste any time and let’s find out below how to start your own gaming blog from scratch in less than 30 minutes!
1. Select Your Blog’s Domain (Name)
Although there are options for you to get a free blog titled something like myblog.blogspot.com or myblog.wordpress.com, if you are really serious about this, you will HAVE TO self-host your blog and get a .com (or other extension) domain name. This helps a lot in establishing a brand and also gives you a lot more options when it comes to customizing your blog, monetizing it and getting in contact with game developers and publishers. The free-hosted blogs are usually ignored without questions.
A .com domain only costs about $12 per year, but the hosting companies that we’re talking about at point #2 below offer a free domain when you sign up, so you don’t have to worry about this expense!
Just make sure that you have a good, catchy, easy to remember domain that is available and at least somewhat related to the gaming niche.
2. Get Hosting for Your Domain
Getting a good host is probably the most important thing when it comes to owning any type of blog. You need a high quality hosting company because otherwise your new gaming website will take ages to load (and you probably know how much you hate slow loading websites!), or it will go down completely and not be available for your readers. Getting a host that offers a free domain and has a platform that’s user-friendly is, therefore, extremely important!
And fortunately, I have the best recommendation for those looking to start their own gaming blog: Dreamhost. This is the hosting company that I’ve been using without any reasons to complain since 2009 and even though I tried other renowned and highly recommended companies, I never considered leaving Dreamhost.
They are decently priced but, most important, they offer a high quality service that will ensure your blog stays online at all times, loading as fast as possible. Managing everything related to your domain is also extremely easy: from installing WordPress with a single click, to setting up your own email address (something like contact@mynewblog.com) and managing everything in between.
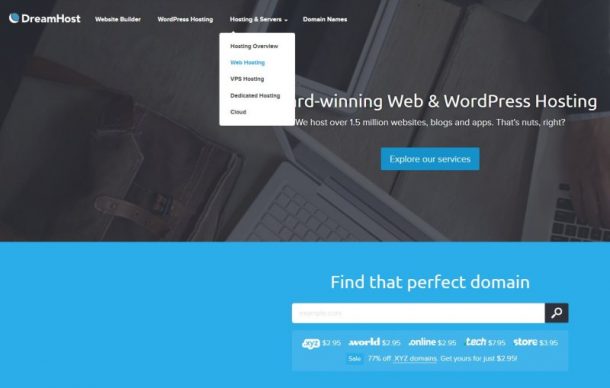
You will need to go for their Shared Hosting option in order to get the best price and there is even a DISCOUNT waiting for you at checkout. So follow the link below, then navigate to Hosting & Servers -> Web Hosting (if you don’t think you can do it, there’s a full guide on that as well below).
Click here to sign up with Dreamhost
Why should you choose Shared Hosting and not something else? It’s because your gaming blog doesn’t require anything better early on in its life. Other hosting options are more expensive and required for websites with a lot of traffic (visitors). Which is not the case of a newly launched blog.
However, once your gaming blog starts getting a ton of traffic, you can click a single button in your control panel and upgrade the service with no downtime or advanced requirements on your side. So go with Shared Hosting first and upgrade later if it’s needed. Many big bloggers are still using Shared Hosting for their properties!
If you need help with setting up everything, I have a complete guide for you below. If not, check my Budget Hosting recommendation below or skip directly to the next step.
1. Go to Dreamhost and select, on the top bar “Hosting & Servers” – Web Hosting:
2. Click the “See our shared hosting plans” button or scroll down until you see their offer:

3. Click the “Sign up for a year of hosting” (or the 3 year if you want a better price) – you will be able to change that before making the payment.
4. Create your account by using an e-mail address and setting up a password. Click “continue”
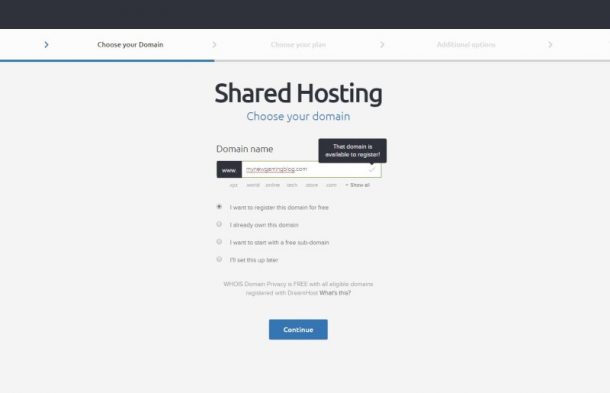
5. Choose the domain name for your blog (you get it for free from Dreamhost). Your domain name has to be unique (meaning that you can’t go for Unigamesity.com or IGN.com or anything similar):
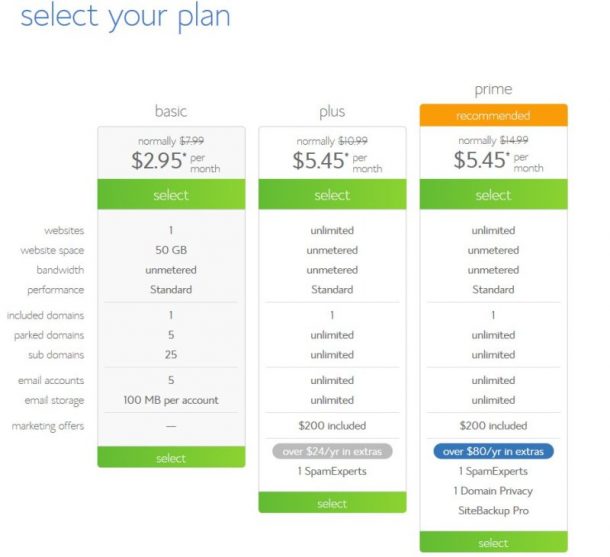
6. Again, you have the option to select the hosting plan you want. Click continue after making your selection:

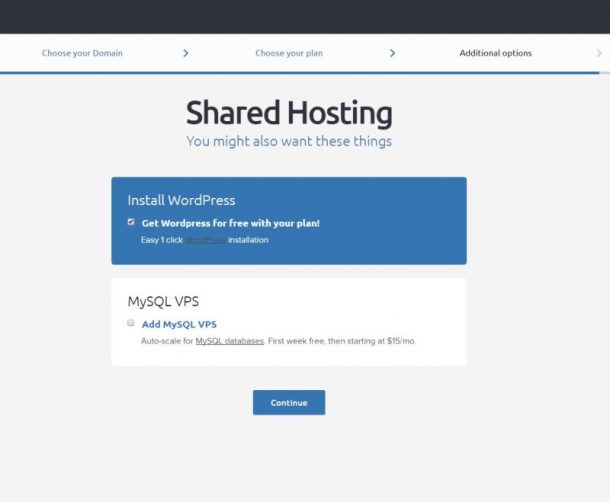
7. It’s best to tick the “Install WordPress” option as it will automatically install it for you. You can also do this in your control panel after signing up:
8. Finally, fill in all the required data and make the payment. You’re now the owner of your very own gaming blog!
You will receive an email from Dreamhost when WordPress is installed on your blog and you will have all the required information for operating the blog in your email.
Alternate (cheaper) hosting option
If you really want to keep costs to a minimum, there’s a decent host offering better prices than Dreamhost. I have also used them and I consider them the second best hosting company you can choose – mainly because they have an ugly, less intuitive control panel. But the good thing is that you won’t spend much time there, so if you’re looking for something even cheaper for your first blog you can go with them:
Click here to sign up with Bluehost
The signup process is similar, but they are offering a huge discount when you sign up with them, meaning that your starting costs will be minimal. So hit the “Get started now” button on their home page, then select the option that’s best for you:
I would recommend going with the Plus version instead of the Basic one. The Basic version limits you to only 1 website (and you never know if you’ll get extremely successful and/or fall in love with blogging and you’ll want to start another) and only gives you 50GB for your website, which is somewhat restrictive. Whatever choice you make, I recommend to skip signing up for all the extras they’ll be offering when you create your account (like site privacy and back-up and so on).
With Bluehost, you will have to take an extra step to install WordPress on your site after creating your account and registering your free domain. You only have to click on a few things, so don’t worry!
Start by logging in to your account on Bluehost and going to Hosting – Website in the top bar:
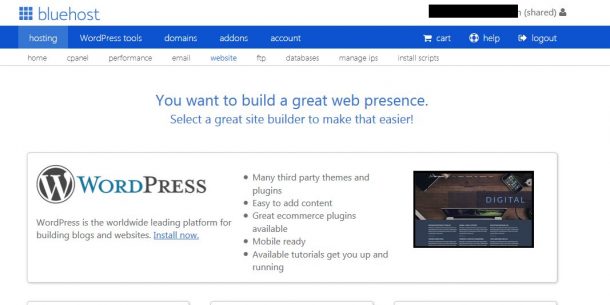
There, simply click the “Install now” button under WordPress. You will have to grant access to Mojo Marketplace first and then you’ll be taken to this screen:
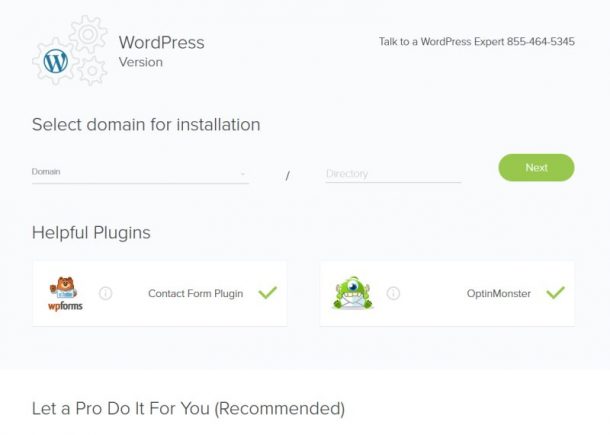
Select your newly registered domain from the drop down menu and leave the “Directory” tab blank. I also recommend to uncheck the two plugins that are automatically selected.
Click the next tab and follow the on-screen instructions to create your Admin Username and Password.
With just a few clicks, you get your gaming blog from Bluehost as well!
So although I recommend signing up with Dreamhost, Bluehost are also a great option especially if you want to keep costs low. And although you can always transfer your website from a host to another, that requires some more advanced knowledge, so it’s best to go with a host you’ll stick with from starters.
3. Find the Perfect Theme (Design) for Your Blog
Most people, when starting their own gaming blog, are looking for a Theme that is created specifically for gaming blogs. This is a mistake, because the offer in this area is extremely limited. Instead, you can go for a highly customizable theme and really make it your own. Most of the themes nowadays allow you to change the way they look (to a greater or lower extend) with just a few clicks, so it’s really easy to make most themes out there your own.
And although there are themes available for free, they offer very little in terms of customization, performance and, for obvious reasons, are not good as ones you pay for. The good news here is that you only pay once for a Theme and it’s yours for life (with most themes getting constant updates to make them even better).
In order to get your Theme, browse the directory on Theme Forest. If you don’t want to waste your time browsing through the thousands of themes or you simply can’t decide, I have some recommendations for you (and they are all optimized to look great on mobile and tablets):
This is the theme I use on Unigamesity and I absolutely love it! It is easy to use, highly customizable and if you don’t feel like doing the extra work for customizing it, you can easily import one of included designs which are extremely varied and cool. Click here to see it in action.
Milana
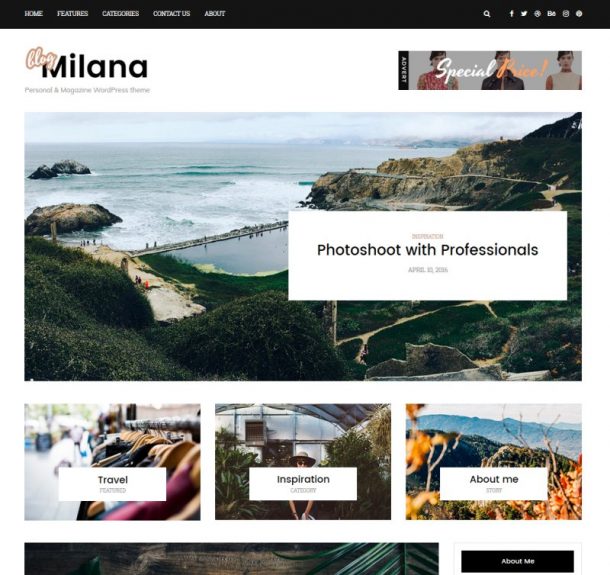
If you want to keep things very simple and clean, Milana is the perfect choice. It looks more like a regular blog, but sometimes you don’t want to waste too much time on finding the perfect design options and you just want to focus on the content. This theme helps you do that. Click here to see it in action.
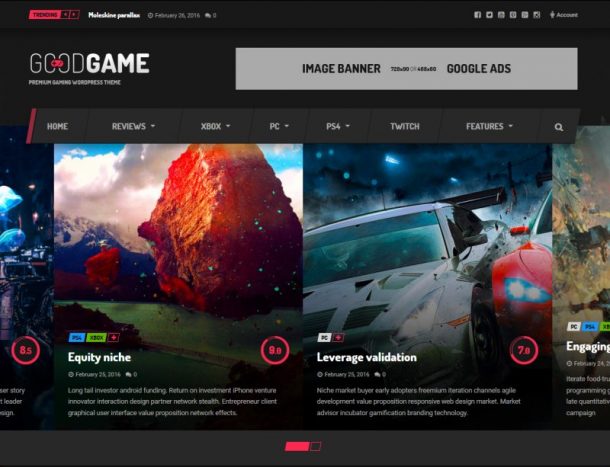
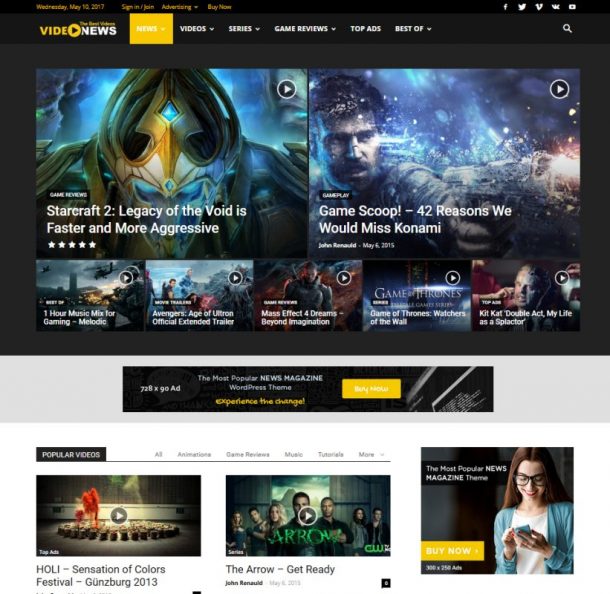
This is one of the better – if not the best – WordPress theme designed for gaming blogs. It has a ton of great features, it looks amazing and also comes with direct Twitch integration to share your live streams with your readers. Even if you don’t use Twitch, it still remains am amazing theme! Click here to see it in action.
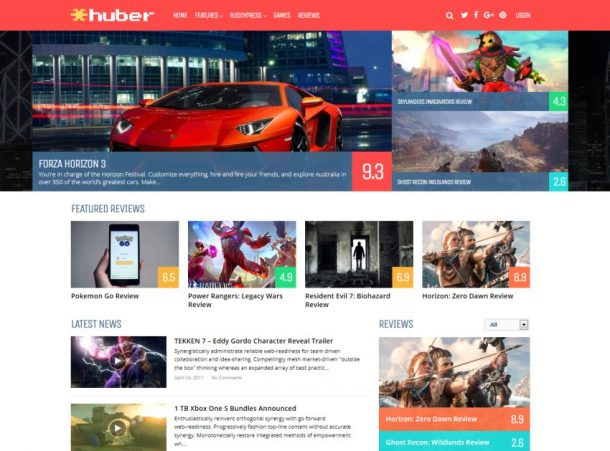
One of the youngest themes on our list, Huber comes with a ton of options, great speed and an amazing design that would be great for a gaming blog. It has a lot of options and features, including cool looking reviews, a special plugin that allows visitors to your website to leave their own reviews, options to create game pages (with all the articles for them and even release dates) – in other words, it’s a gem! Click here to find out more.
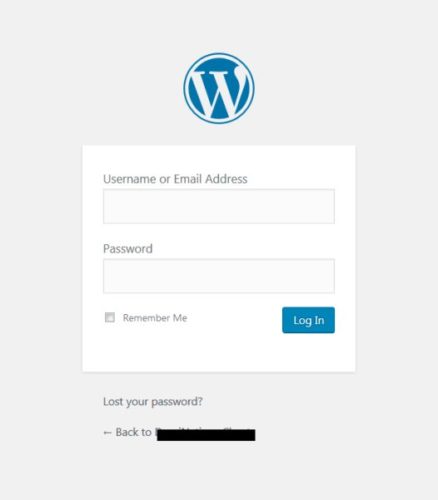
After purchasing your theme, head over to your WordPress website and log in (you will have the URL address to your log-in form in the email sent by your chosen hosting provider). The page itself will look something like this:
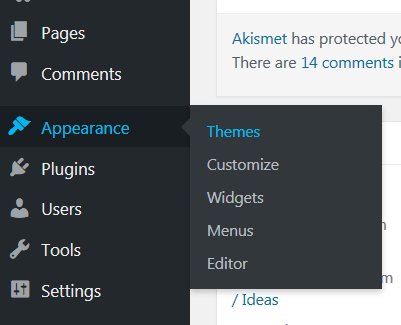
Log in and install the newly purchased theme by going to Appearance – Themes in your sidebar:
Hit the “Add New” button at the top, then select “Upload Theme”. Finally, hit the “Browse” button and upload the theme in zip format, then activate it. You can also start customizing the look of your blog, although it wouldn’t hurt to have a few articles first!
NOTE: When downloading the theme from Theme Forest, make sure that you select “Installable WordPress file Only”. If you go for a more advanced theme such as Newspaper, You will have to download “All Files and Documentation,” extract the files from the archive, then upload the theme zip (Newspaper.zip in our case) – you will need to upload additional files, as per the theme’s tutorials later on in order to activate additional and optional features.
4. Installing Plugins & Services
Your gaming blog is now ready to be launched, but there are some WordPress plugins and services that you should sign up for in order to help your blog even further. As services, I would suggest you to sign up for free for Google Analytics and Google’s Search Console. The first allows you to keep an eye on the number of visitors coming to your website, what they’re doing once there and much more. The Search Console allows you to optimize the website, submit a sitemap and have it indexed faster. You will need a free Gmail account in order to get access to these services.
You should also install the following plugins by going to Plugins – Add New in your new blog’s sidebar. Simply search for the title of the plugins, install and activate them:
– Akismet Anti-Spam (helps you keep spam comments away for a professional looking blog. Usually comes installed by default with all WordPress install).
– All In One SEO Pack (this is a more advanced plugin that will help your blog rank higher in the search engines. The higher your blog appears in search engine results when people search for something, the more people will visit your blog)
– Google XML Sitemaps (an extremely useful plugin that creates a sitemap for your site. These are vital when it comes to telling search engines like Google when new content is published)
– WP Super Cache (this plugin helps making your site a lot faster than it would normally be. This is extremely useful!)
This is it! You now have your gaming blog ready to meet the world. Getting it known and turning it into a profitable business is the most difficult part, but at least you made the first and most important step in the right direction.
If you are interested in finding out more advanced techniques about promoting your blog, making money with your newly launched gaming blog and turning yourself into a pro blogger, comment below or use the Contact page to let me know. Based on the feedback this article receives, I will decide if a follow-up with more advanced details and tips should be written or not.
Until then I wish you all the success in the world for your new gaming blog!


Game modifications, or “mods,” are custom alterations made to existing video games that enhance or transform various aspects of the gaming experience. These modifications can range from simple visual tweaks to complete overhauls of game mechanics, graphics, storylines, and features. Mods breathe new life into games, allowing players to personalize their experience far beyond what developers originally intended.
LyncConf has emerged as a leading hub for curated game modifications, offering a carefully selected collection of mods alongside tutorials and community-driven resources. Unlike scattered mod repositories that often lack quality control, LyncConf focuses on providing stable, tested modifications that work seamlessly together. This article explores how LyncConf fits into the broader modding ecosystem and why gamers are increasingly turning to this platform for their modding needs.
The Evolution of Gaming Mods & Role of LyncConf

The history of game modding stretches back decades, beginning with simple map edits and basic texture replacements in early PC games. What started as hobbyist tinkering has evolved into a sophisticated subculture within gaming, with modders creating everything from minor quality-of-life improvements to massive total conversion projects that completely reimagine games.
Today’s modding culture has matured significantly. Millions of players worldwide regularly use mods, and ambitious projects can rival professionally developed content in scope and quality. Major game studios have embraced this trend, with many developers actively supporting modding communities through official tools and resources. The line between professional and amateur content continues to blur as talented modders push creative boundaries.
Within this landscape, LyncConf positions itself as a curated repository that prioritizes stability and ease of use. Rather than serving as an unfiltered dump of every available mod, the platform carefully vets modifications to ensure they meet quality standards. This approach reduces the risk of game-breaking conflicts and provides users with confidence that downloaded mods have been tested for compatibility.
Also Read: FIFA 13 Career Mode Guide: Best Young Players
What Types of Mods LyncConf Offers (and Supported Games)
LyncConf organizes its extensive mod library into several key categories, making it easy for users to find exactly what they’re looking for:
Graphics and Visual Enhancements include high-definition texture packs, enhanced lighting systems, improved weather effects, and realistic shader modifications that can transform a game’s appearance. These mods range from subtle improvements to dramatic visual overhauls.
Gameplay Tweaks modify core mechanics, balancing issues, difficulty settings, and player abilities. Whether you want combat to feel more realistic or prefer a more forgiving experience, gameplay mods offer extensive customization options.
Audio Mods enhance or replace sound effects, music, and voice acting. Some mods introduce entirely new soundtracks, while others improve the quality of existing audio assets.
User Interface Tweaks streamline menus, improve inventory management, add helpful information displays, and generally make games more user-friendly through better interface design.
Mechanics Reworks represent more ambitious modifications that fundamentally change how games function, introducing new systems for crafting, economy, progression, or even entirely new gameplay modes.
LyncConf supports modifications for popular titles including Skyrim, Minecraft, and GTA V, among many others. For these games, you’ll find comprehensive mod collections covering everything from texture packs and weather systems to gameplay overhauls and expanded content.
Also Read: Harmonicode Gaming: Revolutionizing Performance and Player Experience
Top Visual & Graphics Mods
The visual enhancement category showcases some of the most impressive transformations available. High-definition texture packs can make years-old games look modern, bringing crisp detail to environments, characters, and objects. Enhanced weather systems add dynamic storms, realistic fog, and atmospheric effects that dramatically improve immersion. Many visual mods also include 4K texture packs for users with powerful hardware, pushing graphical fidelity to new heights.
Gameplay Overhauls and Mechanics Upgrades
For players seeking deeper changes, gameplay overhauls introduce new weapon types, smarter enemy AI, rebalanced crafting systems, and revised game economies. These modifications can fundamentally alter how a game feels to play, offering fresh experiences even for titles you’ve completed multiple times. Some overhauls are so comprehensive they essentially create new games within existing frameworks.
Why Gamers Might Choose LyncConf Mods (Benefits vs Vanilla)
Choosing to mod your games through LyncConf offers several compelling advantages over playing vanilla (unmodified) versions:
Improved Immersion: Visual enhancements, realistic weather systems, and enriched environmental details create more believable game worlds. Better graphics and atmospheric effects draw players deeper into the experience, making virtual environments feel more alive and engaging.
Extended Content: Many mods add new missions, character interactions, locations, and story elements that extend gameplay well beyond the original content. This is particularly valuable for games you’ve already completed, offering fresh reasons to return.
Customization & Personalization: Mods allow you to tailor games to your specific preferences. Interface tweaks make information more accessible, custom mod combinations let you build your ideal gameplay experience, and personalization options ensure the game feels uniquely yours.
Stability & Reliability: One of LyncConf’s key differentiators is its focus on tested, compatible modifications. Mods available through the platform undergo compatibility checks and stability testing, significantly reducing the risk of crashes, save corruption, or game-breaking bugs compared to unverified mods from random sources.
Variety & Breadth: Whether you’re a casual player looking for simple quality-of-life improvements or a hardcore modder seeking complex overhauls, LyncConf offers options for all experience levels. The platform’s diverse collection ensures you can find mods that match your technical comfort level and desired gameplay changes.
How to Install LyncConf Game Mods Safely — Step-by-Step Guide
Successfully installing mods requires following proper procedures to avoid conflicts and maintain game stability. Here’s a comprehensive guide to getting started:
Recommended Tools
Professional mod managers are essential for safe, organized modding. Popular options include Mod Organizer 2 (MO2), which offers excellent organization and conflict management, and Vortex, which provides a more streamlined user interface. These tools help manage load orders, detect conflicts, and keep your mod setup clean and functional.
Installation Workflow
Step 1: Download and Install a Mod Manager
Choose a mod manager compatible with your game and install it according to the provided instructions. Configure it to recognize your game’s installation directory.
Step 2: Create a Dedicated Mod Profile
Set up a specific profile for your game within the mod manager. This allows you to maintain different mod configurations and easily switch between setups without conflicts.
Step 3: Download Verified Mods
Navigate to LyncConf and download mods labeled as “verified” or “tested.” These designations indicate the mods have undergone quality checks and compatibility testing.
Step 4: Check Dependencies and Compatibility
Before activating mods, review their requirements. Many mods depend on other mods or specific game versions. Your mod manager should help identify these dependencies and alert you to potential conflicts.
Step 5: Launch Through Your Mod Manager
Always start your game through the mod manager interface rather than directly. This ensures mods load correctly and in the proper order, preventing conflicts and crashes.
Troubleshooting Common Issues
Even with careful installation, problems can occur. If you experience crashes, first check that all mod dependencies are installed and enabled. Adjust your load order by placing mods that modify similar game elements in compatible sequences. Disable recently added mods one at a time to identify problematic modifications. Use your mod manager’s conflict detection tools to find and resolve file conflicts between mods.
Tools & Platforms That Complement LyncConf Mods
Beyond basic mod managers, several specialized utilities enhance your modding experience:
Load Order Tools automatically optimize the sequence in which mods load, preventing conflicts and ensuring stable performance. These tools analyze mod relationships and dependencies to create optimal loading configurations.
Patchers and Merge Tools combine compatible mods into unified files, reducing plugin counts and improving performance. They can also create compatibility patches that allow incompatible mods to work together.
Conflict Detection Software scans your mod setup to identify files that multiple mods attempt to modify. These tools help you understand potential issues before they cause problems in-game.
Graphics Mod Managers specifically handle visual modifications, offering specialized features for texture management, shader configuration, and graphical settings optimization.
These tools matter because modern mod setups can become quite complex. Without proper management, you risk game-breaking conflicts, poor performance, or corrupted saves. The right utilities make modding accessible and safe, helping you build stable configurations that enhance rather than hinder your gaming experience.
For beginners, start with user-friendly mod managers and simple modifications. As you gain confidence, gradually explore more advanced tools and complex overhauls that require sophisticated management.
Community & Contribution: Mods Beyond Just Downloads
LyncConf’s strength extends beyond its mod library to the vibrant community that supports it. User-submitted modifications, detailed reviews, constructive feedback, and comprehensive tutorials create a collaborative environment where modders and players help each other succeed.
Community-driven modding hubs like LyncConf thrive on shared knowledge. Members create custom mod lists tailored to specific playstyles, develop bug-fix patches for problematic mods, provide ongoing technical support, and contribute to stability improvements over time. This collective effort ensures mods remain functional as games receive updates and as new modifications emerge.
You can contribute to this ecosystem in several ways. Submit your own mods for consideration in the LyncConf library, participate in community forums or Discord servers to help other users troubleshoot issues, assist in updating or patching existing mods to maintain compatibility with game updates, and provide detailed feedback on mods you’ve tried to help others make informed decisions.
Recent Updates & What’s New at LyncConf (2025)
LyncConf has rolled out several significant improvements in 2025, enhancing both performance and user experience. Platform stability has been upgraded to handle larger mod libraries more efficiently, and the download process has been streamlined for faster, more reliable mod acquisition.
New features introduced this year include automatic patch updates that keep your mods current without manual intervention, an enhanced mod rating and review system that provides better insights into mod quality and compatibility, improved compatibility tracking that alerts users to potential conflicts before installation, and upgraded mod management features that simplify organization and maintenance.
Looking ahead, LyncConf’s roadmap includes potential console support to bring modding to a broader audience, expanded multi-platform functionality for users who game across different systems, and additional community features designed to foster collaboration and knowledge sharing among modders and players.
Frequently Asked Questions (FAQ) / Common Concerns
Is it safe to use mods from LyncConf? What about game stability and security?
LyncConf prioritizes safety through its curation process. Mods undergo compatibility testing and security checks before being made available. While no modding platform can guarantee zero issues, LyncConf’s verification system significantly reduces risks compared to unvetted sources. Always back up your saves before installing new mods as an additional precaution.
Can I use LyncConf mods on consoles, or are they PC-only?
Currently, LyncConf focuses primarily on PC modding, as console platforms have significant restrictions on modifications. However, console support is being explored for future development, particularly as console manufacturers gradually open up to modding communities.
Will mods interfere with game updates or multiplayer functionality?
Game updates can sometimes break mods by changing files that modifications depend on. It’s wise to wait a few days after major game updates before playing with mods, giving mod authors time to release compatibility patches. Regarding multiplayer, many games prohibit mods in online modes to prevent cheating. Always check a game’s terms of service and disable mods when playing online unless explicitly allowed.
How do I handle mod conflicts?
Mod managers include conflict detection tools that identify problematic overlaps. When conflicts arise, you can often resolve them by adjusting load order, using compatibility patches, or choosing between conflicting mods. The LyncConf community forums are also excellent resources for troubleshooting specific conflicts.
What mods are beginner-friendly, and which require advanced knowledge?
Simple visual enhancements, interface improvements, and minor gameplay tweaks are excellent starting points for beginners. These typically have minimal installation requirements and low conflict potential. Complex gameplay overhauls, script-heavy modifications, and total conversion projects are better suited for experienced modders who understand load orders, dependencies, and conflict resolution.
Conclusion / Final Thoughts
LyncConf represents a compelling option for gamers interested in exploring game modifications. Its carefully curated mod collection, combined with strong community support and emphasis on stability, strikes an effective balance between extensive customization and reliable performance.
The platform is particularly well-suited for casual players curious about modding, beginners who want a safe introduction to the modding world, and experienced modders seeking well-managed, tested modifications without the hassle of sorting through countless unverified options.
As you explore the world of game mods through LyncConf, remember to approach modding responsibly. Always check compatibility information, maintain backup saves, use proper mod managers, and engage with the community for guidance and support. With these practices in place, modding can transform your favorite games into personalized experiences that remain fresh and exciting for years to come.
Whether you’re looking to enhance graphics, expand content, or completely reimagine how a game plays, LyncConf provides the tools, mods, and community support to make your vision a reality. Happy modding!

Horse racing is a globally spread sport with billions of fans worldwide. The thrills of the races and the excitement of the betting make horse racing quite popular among adrenaline rush seekers.
However, unlike other sports like football or basketball that you can actually try in your backyard, becoming a racehorse rider is out of reach for most people. But all hope for our fellow race lovers is not lost and the gaming world comes to the rescue.
We are talking about horse racing simulation games where you can pick or breed your own horse, participate in online racing tournaments, earn prestige, take care of your horse, and much more.
Horse racing video games are perfect when it comes to getting the bigger picture of the sport and familiarizing yourself with other aspects apart from racing, like stable management, breeding, and finance management.
On top of that, horse racing video games can help you understand how the sport works, which may help you with the next bet you make on TwinSpires.
Fortunately, there are plenty of horse racing games for iOS, and in today’s article, we will highlight some of the best that you should try.
Rival Stars Horse Racing
This is a game made by a legendary horse race video game developer called PikPok and it is without a doubt one of the best horse racing games available for iOS right now.
The graphics look incredible for a mobile game. They are quite realistic, and the horse movement and the design of the tracks also give you the feel that you are participating in a real-world race.
Rival Stars Horse Racing has quite a fast pace, where you can complete some quests and upgrade your stable, but the focus is on the races, as it should be.
When we talk about the racing part of the game, every racetrack that you unlock offers something new. You get to race at different lengths and surfaces. But let’s focus on the important part, race mechanics.
You can steer the horse, brake, and activate their sprint ability. The horse’s performance is based on multiple factors such as ground consistency, position, race length, previous races, and much more.
Rival Stars Horse Racing also has a quite good breeding, training, and managing system. On top of that, there are many different horse coat colors and breeds. Unlike other games like Zelda where you can get a gold horse, Rival Stars Horse Racing focuses on realism. All of the horses have natural coat colors and traits.
You get to collect or breed horses, transform foals to feed, and upgrade facilities to unlock more options to progress.
The only thing that is missing from the game is the audience on the races since the race courses feel a bit empty with nobody around.
Horse Racing Manager 2024
This is a game that has a rather different approach than Rival Stars Horse Racing. It is focused more on the managing part of horse racing rather than on the actual gameplay and racing. You are in control of your business operation and your goal is to succeed in the world of horse racing and earn money.
You don’t have an impact on the races, and you cannot control your horse. The races are simulated, and the outcome depends on your horse’s stats and abilities.
That’s why horse training, and breeding a champion horse play a really important role in the game.
The best thing about Horse Racing Manager 2024 is the ability to race online. There are live PVP races that occur every 5 minutes and everyone can participate in them.
This is the perfect game if you want to learn what’s happening behind the curtains of horse racing as a sport. You are in control of your breeding rights that you can sell, as well as the age and career path of your horse.
It is an interesting game, especially for those who are not afraid of data and analysis.
iHorse Racing
This is a similar game to Rival Stars Horse Racing but with worse graphics, and fewer options. This game has multiple features like horse training, stable management, horse auction, race entries, CLU-jockey hiring system, and world jockey ranking, and you can connect your Facebook profile to invite friends.
To be honest, the graphics and gameplay of the game are fun and engaging, but I’d still go for Rival Stars Horse Racing, especially if you like a more realistic horse racing game.
Pocket Stables
Let’s drop down all the realism and focus on some retro 2D gameplay. For all retro game lovers who have a passion for horse racing, Pocket Stables is just the perfect game. At first glance, this game might look simple, but it actually has many features that make it even more fun.
For starters, you can build training facilities where you can increase your horse’s stats. Additionally, not all horses are the same and your goal should be to find a horse with the right balance of speed, stamina, and intensity.
As you win races, you’ll receive prizes, that can be used to upgrade your stable and give you better ways to breed a faster horse.
It’s fun, casual, and quite cute. Plus, you get to build your horse racing community and hire people that will take care of your stable.

Are you facing difficulty in engaging your audience with tech posts on Instagram? As social media platforms have transformed into virtual marketplaces, brands recognize the need to showcase expertise through engaging content.
Platforms like Instagram empower connecting with worldwide audiences through captivating visual stories. But, it is quite a daunting task to work and many move ahead to buy Instagram followers as well.
Contemporary consumers scarcely have time for promotion lacking substance. Hence, creatives demand integrating education with entertainment for intrinsically motivating connections. This is why in this post, we discuss top ideas for your tech-posts on Instagram. Read on.
Top Instagram Post Ideas for Technology in 2024
There are many creative and unique ways to catch attention for your technology posts on Instagram. Below we discuss some of the most popular ones that can certainly get all eyes on you.
I. Using Tech Products as Props
Showcasing the ergonomic elegance of newest smartphones through lifestyle photos depicting them harmonizing with modern interiors signifies how technologies enhance lives unobtrusively.
Flat lays carefully arranging phones alongside complementary gadgets like smartwatches and earbuds exhibits compatible accessories apt for varied tasks. Close-up shots exploring interesting details on laptops or cameras from unique angles pique curiosity towards innovative engineering.
Illustrations envisioning people multitasking efficiently through integration of different devices tells stories audiences relate to. Including props within realistic settings displays practical applications beyond technical specifications.
II. Behind the Scenes Photos of Tech
Sneak peeks hinting at cutting-edge features of anticipated device launches grant exclusivity while cultivating hype. Well-lit workplace photographs portray engineers concentrating on prototyping components and inspire admiration.
Snapshots capturing programming teams collaborating wirelessly on interactive whiteboards through mobile apps demonstrate streamlined productivity. Infographics adorning clean designs simplify explaining complex algorithms behind facial recognition or data analytics in accessible language.
Short videos taking viewers inside futuristic factories reveal meticulous manufacturing processes with a sense of intimacy.
III. Infusing Tech with Humor
Lighthearted memes humorously portraying predictable reactions to everyday tech troubles provide comic relief to stressful scenarios. Relatable situations humorously presented divert from serious sales pitches.
Personified tech objects in comical misadventures amuse audiences through humanizing technology. Satires skewering society’s obsession with smartphones in a tongue-in-cheek manner encourages shares to spread smiles. When infused judiciously, humor aids connection by sparking emotions beyond sales.
IV. Showcasing the Human Side of Tech
Introducing changemakers through portraits celebrating their groundbreaking work nurtures admiration. Profiles highlighting individuals transforming lives through accessible education technologies promote empowerment.
Environmental initiatives leveraging automation to offset carbon footprints brings a humanistic face to sustainability efforts. Impactful community projects excelling through connectivity showcase technology uplifting society versus solely profit motives.
Sensitively showcasing stories of overcoming challenges strengthens bonds between brands and audiences.
V. Visual Presentations of Tech Topics
Creative arrangements of flat lays showcasing virtual or mixed reality controllers provides an experiential feel of the immersive tech itself. Sequential photos arranged like puzzle pieces or in grids present complex technical concepts through visual storytelling.
Infographics leveraging minimalist aesthetics simplify explaining blockchain or cloud computing. Illustrations personifying IoT appliances in a “day in life” routine brings relatability to innovations perceived as complex. Data visualizations comparing tech trends succinctly impart industry insights.
VI. Leveraging Trending Tech Themes
Imaginative demonstrations of artificial intelligence streamlining lives pique intrigue towards groundbreaking research. Showcasing developments in robotics, VR or internet of things solving pressing issues cultivates social purpose beyond sales.
Highlighting startups leveraging cutting-edge innovations attracts investors and talent. Curated reels condensing key takeaways from tech summits grant exclusive access. Tactical hashtags around concepts ranging from 5G to cybersecurity optimize discovery of relevant audiences worldwide.
Unique Ways To Boost Engagement
With competition so fierce, it becomes difficult to keep your audience engaged with your post. Below we discuss some essential tips that can make things easy for you. Take a look:
● Researching Optimized Hashtags
Analyzing hashtag clusters witnessing frequent usages around niche conversations aids discovering appropriate tags aligning with targeted audiences. Careful hashtagging aids discoverability and spreads messages to receptive crowds naturally.
● Optimizing Images For Social Formats
Adjusting photos to square dimensions suitable for Instagram feeds and story formats preserves visual quality and context. Proper sizing and cropping focuses viewer attention on essential elements.
● Scheduling Around Peak Engagement Timings
Identifying timing patterns of highest follower activities through analytics aids posting when most eyeballs will likely notice new updates. Repurposing top performing content as story highlights retains visibility.
● Reviewing Engagement And Follower Insights
Regularly evaluating metrics like likes, comments, saves and follower growth rates aids comprehending reception and refining strategies. Tracking identified hashtag or location based communities’ interests guides customized content.
● Partnering With Key Influencers
Reaching wider audiences through cross-promotional shoutouts with popular domain figures expands networks. Collaborations establishing brand authority through third party endorsements bolster credibility.
Final Thoughts
In summary, effectively leveraging visual creativity fueled by data-driven decisions establishes technology companies, alongside support from a dedicated social media growth agency like Thunderclap.it, as thought leaders amid competition on platforms like Instagram.
Consistency, authenticity, and nurturing communities through meaningful interactions are crucial for driving organic visibility and achieving superior returns on social media. While maintaining technical excellence is essential, emotionally connecting with audiences through social missions and humor helps build a loyal following and fosters trust in this experience-driven world.
-
 Guides6 years ago
6 Proven Ways to Get more Instagram Likes on your Business Account
-
Mainstream11 years ago
BioWare: Mass Effect 4 to Benefit From Dropping Last-Gen, Will Not Share Template With Dragon Age: Inquisition
-
 Mainstream7 years ago
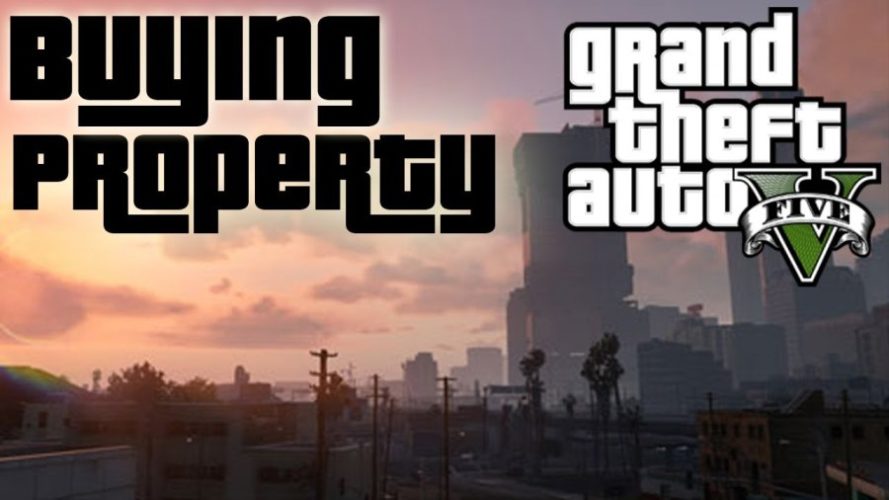
How to Buy Property & Safe Houses in GTA 5 (Grand Theft Auto 5)
-

 Guides2 years ago
Free Fire vs PUBG: Comparing Graphics, Gameplay, and More
-

 Guides1 year ago
50+ Free Fire ID and Passwords Login List (Giveaway) 2025
-
 Casual3 years ago
8 Ways to Fix Over-Extrusion and Under-Extrusion in 3D Printing
-

 Other2 years ago
Ajjubhai UID: Free Fire Details & Earnings
-

 Features2 years ago
Exploring Valorant eSports Stats: Unveiling the Metrics Behind Competitive Excellence