Casual
Greatfruit Grove Cheats, Tips and Tricks

I just told you a little while ago that I got hooked on Greatfruit Grove, a pretty nice orchard building game and I have decided to share a bunch of Greatfruit Grove cheats with you, actually a set of tips and tricks for this relatively easy game, but one that can drive you crazy with its seedling combinations.
If you have trouble with getting the trees you want, check out the Greatfruit Grove Tree Combinations guide I have posted earlier, that should be a good place to start. Now let’s check out below a set of Greatfruit Grove tips and tricks!
1. Start by planting as many trees as possible
Keep splicing and planting trees. You need a lot of fruit at first to remove all the obstacles and to upgrade the monkey tree, so every little bit counts. Eventually, the Bulba (red tree) will start to drive you crazy as you will have a ton of them, but they will help at first.
2. Don’t be afraid to sell trees!
If you run out of space or get a tree that you don’t want, sell it. You will receive 2 seeds of that tree instantly, but save a lot of space in your grove.
3. Always keep trees fertilized
The idea is simple: always use with the cow the seed that gives the most fertilizer and try to collect the fertilizer as soon as possible. As you progress through the trees, you will need more and more fertilizer for an extra seed, so stock up as much as you can.
A good idea with the fertilizer is to ignore the trees that you have a ton of (like bulba) and focus on the bigger and better trees, because that’s where good upgrade value comes. However, I tend to always try and have all the trees fertilized because it simply speeds things up.
4. Remove all the scary stuff from the Greatfruit Grove
Scary stuff makes your trees unhappy, and that is not good. Focus all your fruits on removing the scary stuff first!
5. Keep the rare trees near decorations
A happy tree produces the seed(s) twice as fast than an upset one and happy trees are those near decorations, so place the rare trees there and leave the others behind. We can usually have 8 trees around a single decoration, which is a pretty good number.
6. Keep your Shiny
Sometimes, not getting the tree that you want will make you wish to spend Shiny (diamonds) to get it. But don’t do it! Instead, keep completing the missions and raise your first 100 diamonds. This way, you can unlock a new fertilizer spot which will help you more in getting the trees that you need.
7. Always keep 5 fruits at hand
Some of the basic trees require 5 seeds in order to be purchased. So make sure that you have at least 5 fruits of each saved up in case you need them.
8. Dormant trees
After a few days, your trees will go dormant. In this case, you have two options: either sell them which only makes sense for the cheapo trees, or have your friends come over and wake them up to produce fruit again. If you don’t have friends, it would be best to know ahead before a tree is about to become dormant to prepare at least a new replacement. Either way, even if you don’t prepare, since you get 2 seeds for each tree you sell, you can create new ones.
9. Add friends!
This is pretty obvious – you need some friends if you want an easier game (and some extra shiny as there are some missions that require you to have friends). If you don’t have people playing the game, you can add your id in the comment section below and hopefully some other Greatfruit Grove players will help.
And this would be it! These are my Greatfruit Grove tips and tricks – if you have some more, share them with us below!


Imagine coming home after a long day, sinking into your comfiest chair, and just letting the world fade away as you dive into a game online. It’s like you’ve got a personal amusement park at your fingertips, one that helps you chill out but can also send you on a thrilling ride with a click or a tap. That’s the sweet spot of online gaming—it wraps you up in a cozy blanket of fun that can also get your heart racing.
The cool part about playing online games isn’t just that they’re a blast; it’s how they help us unwind too. With the right game, you can kick back and experience that awesome feeling when you’re right in the zone – the worries of the day slip away, and it’s just you and the game. And yet, there’s this undercurrent of excitement because at any moment, something in the game could change, and bam – you’re on the edge of your seat!
Sorting the Dazzling from the Duds: How Casino Reviews Help
But with so many games out there, how do you know which ones bring that perfect mix of Zen and zest? Cue the heroes of the online gaming world: top casino reviews. Top casino reviews are the trusty guides that help you navigate through the endless sea of games, showing you where the treasure is—and where you might hit some rough waters.
Reading a solid casino review is like getting a tip-off from a friend who knows all the best spots in town–they help you find the games that are worth your time, the ones with the smoothest gameplay, the coolest graphics, and the best chances to win. They’ll point you in the direction of games that are relaxing to play but also pack just the right amount of punch to keep things lively.
A Little Light Reading for Big-Time Fun
Tapping into these reviews before you play can save you a bunch of time. The experts writing these reviews have spent hours checking out all the features of a game, figuring out all the details. They do the legwork, so you don’t have to–and let’s be honest, who doesn’t like getting the inside scoop?
Jumping into a game with a good review backing it up gives you that snug feeling of knowing you’ve made a smart pick. And with a reviewer’s expert advice in your corner, you can settle in and start playing with confidence. It’s about getting to the good stuff, the games that satisfy and surprise, without the trial and error of finding them yourself.
Comfort Gaming: Choosing the Right Fit for You
Just like finding the right pair of sneakers, it’s about finding the games that fit you just right. Some folks might be into the snazzy, fast-paced slots that get your pulse jumping. Others might prefer a laid-back round of poker that lets you take your time and soak up the game. Reading up on reviews helps you find your gaming ‘just right’—the games that feel tailor-made for your style of winding down.
It’s about figuring out what games hit that sweet spot where you feel comfy and excited all at once. Maybe it’s the game’s visuals, maybe it’s the soundtrack, or perhaps it’s just the way the game feels. Whatever it is, when a game is just right for you, it turns your downtime into the kind of high-quality leisure time we all deserve.
Your Gaming, Your Way: Reviews Lead the Way to Personalized Play
In the end, what makes a game great for kicking back and having fun is how it fits with your vibe. And that’s precisely where those top-notch casino reviews come in. They take what could be an overwhelming choice and whittle it down to a handpicked selection, just for you. Thanks to the reviewers’ expertise and attention to detail, it’s like having a personal guide to the gaming galaxy, leading you straight to the stars that shine the brightest for you.
So, before you fire up the laptop or tap open an app, take a moment to explore what the casino critics have to say. They help light up the path to the games that offer the best of relaxation and exhilaration, ensuring your playtime is time well spent. With the right game, your online adventures can be the pause-and-reset button we all sometimes need, spiced up with just the right amount of thrills to keep things interesting.

In the dynamic and competitive world of cloud computing, effective cost management is crucial for businesses leveraging the power of the Google Cloud Platform (GCP). While GCP offers scalability, flexibility, and powerful features, navigating its cost structures can be complex. Understanding and applying targeted cost optimization strategies is key to harnessing the cloud’s full potential without incurring unnecessary expenses.
Google Cloud Premier Partner
Engaging with a Google Cloud Premier Partner can provide valuable insights for businesses looking to optimize their cloud costs. As a consultancy and advisory service, they focus on guiding companies in their strategic planning for cloud utilization, offering expertise in cost optimization without directly implementing cloud technology solutions. Their role is instrumental in helping businesses understand and navigate the complexities of Google Cloud cost management.
Identifying Cost Drivers
A fundamental aspect of cost optimization is identifying the main cost drivers in your Google Cloud setup. This includes evaluating resource usage patterns, pinpointing underutilized resources, and recognizing instances where resources may be unnecessarily deployed. Businesses can pinpoint areas where costs can be trimmed without impacting performance by conducting a comprehensive audit of these factors.
Right-Sizing Resources
Right-sizing is crucial to ensure you use the most cost-effective resources for your workload needs. This means adjusting the size and type of your Google Cloud resources – like Compute Engine instances – to match your actual usage requirements. Regularly reviewing and adjusting these resources can lead to significant cost reductions.
Commitment-Based Discounts
Google Cloud offers various pricing models, including sustained use and committed use discounts, which can benefit long-term cost savings. Businesses can take advantage of these models by understanding and forecasting their resource needs. Committed use discounts, for example, offer lower prices for a specified usage level over a set period.
Storage Optimization
Proper data storage management is a key area for cost savings in Google Cloud. It involves selecting the right storage classes and managing the data lifecycle effectively. Businesses can use different storage classes for data based on access frequency and retention requirements, significantly reducing storage costs.
Network Optimization
Optimizing network usage in Google Cloud is a critical step toward cost savings. Strategies include leveraging Google Cloud CDN for efficient content delivery and reducing latency and bandwidth costs. Additionally, strategically selecting network regions can significantly impact data transfer costs. Placing resources in regions closer to the end-users can minimize latency and reduce the cost associated with data movement across regions.
Furthermore, implementing custom network topologies can optimize traffic flow and reduce costs. For instance, using Google’s Premium Tier network for high-priority traffic and Standard Tier for less critical traffic can balance performance needs and cost efficiency. Adopting performance routing and load balancing also ensures traffic is managed efficiently, reducing unnecessary load and associated costs.
Monitoring and Reporting
Effective cost management in Google Cloud relies heavily on continuous monitoring and regular reporting. Utilizing tools like Cloud Billing Reports and Cost Management, businesses can gain comprehensive insights into their cloud spending. These tools provide detailed breakdowns of expenditures, allowing for precise resource usage tracking and cost trend identification.
In addition to these tools, setting up custom alerts for budget thresholds ensures that spending does not exceed planned limits. This proactive approach enables businesses to adjust their usage and strategies, preventing budget overruns quickly. Moreover, integrating cost management tools with existing business analytics systems can provide a holistic view of cloud spending in the context of overall business performance.
Regularly scheduled reviews and audits of cloud expenditures are also vital. These reviews should assess current spending and forecast future usage patterns and needs. By doing so, businesses can make informed decisions about scaling resources up or down, choosing the right pricing models, and identifying areas where cost efficiency can be improved.
Conclusion
Optimizing costs in Google Cloud is an ongoing process that requires continuous assessment and adaptation. With the expert advice from a Google Cloud Premier Partner businesses can develop a more efficient and cost-effective cloud strategy. Remember that each organization’s needs are unique, and strategies should be tailored accordingly. By staying informed and responsive to the dynamic nature of cloud computing, businesses can ensure they are getting the most value from their investment in Google Cloud.

Are you sick and tired of trying to fix problems every time you print a 3D object? Tired of under-extrusion, when your printer doesn’t produce enough material, or over-extrusion, when it deposits too much and causes untidy, distorted prints?
Don’t stress! This article delves deep into the issues that plague 3D printing and provides eight crucial methods for overcoming under-extrusion and over-extrusion. Prepare to take your 3D printing to new heights and produce immaculate works of art like never before!
Understanding Under-Extrusion and its Causes
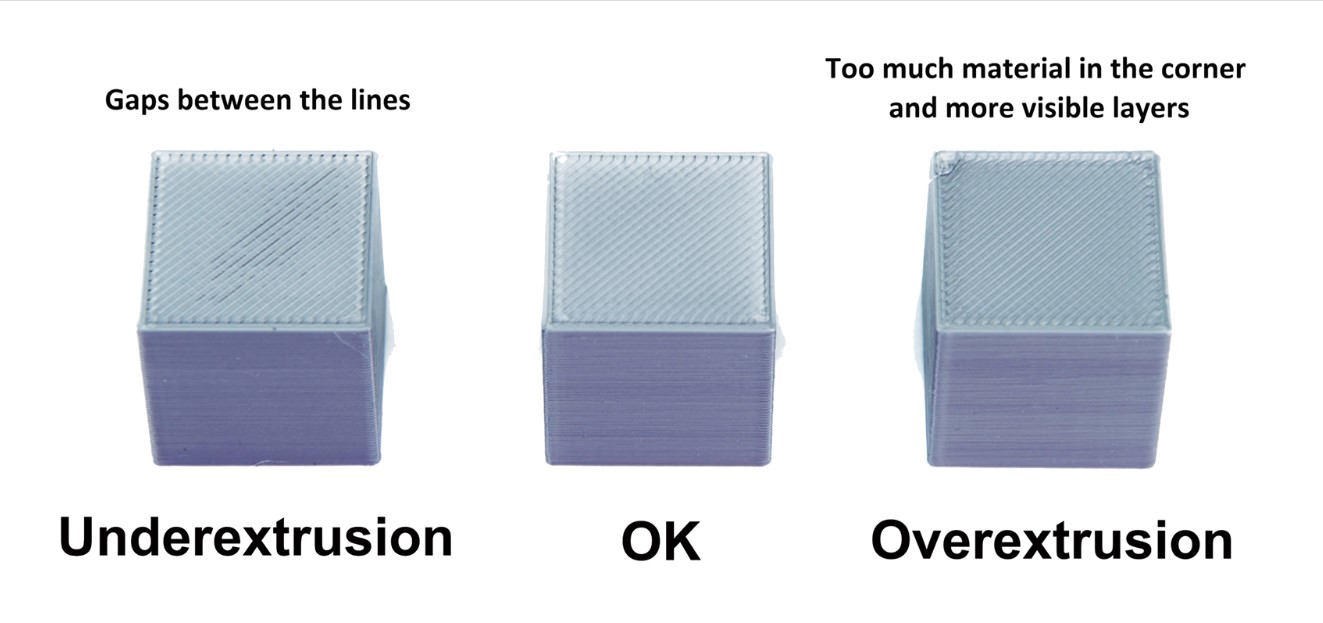
So, you’ve got a 3D printer, and you want to make some amazing stuff, like toys, gadgets, or even miniature statues. However, the 3D printed product isn’t always what was expected. The layers may appear thin, and you may not get a complete print. This condition is known as under-extrusion. This occurs when the 3D printer fails to use sufficient material to construct each layer.
There are a number of potential causes of under-extrusion. One of the most common reasons is that the tiny hole in the printer’s nozzle gets blocked, like when a sink gets blocked. This hinders the easy movement of the material (often a unique plastic known as filament).
Incorrect printer configuration is another possible cause. To put it another way, it’s the same as ordering the printer to use too much paper. The printing process might potentially be ruined if low-quality filament is used.
However, rest assured! Under-extrusion might be fixed using our fantastic strategies. Here are eight simple methods guaranteed to improve the quality of your 3D printouts. Let’s jump in together and learn everything there is to know about fixing under-extrusion!
8 Simple Ways to Prevent Under-Extrusion
Does your 3D printing lack detail and strength? Here are 8 simple ways to prevent under-extrusion and produce better 3D prints.
Nozzle Cleaning: A clogged nozzle is typically the cause of under-extrusion, which is fixable by cleaning it. The melted filament can flow freely through the nozzle, which acts like a little tunnel. However, it becomes difficult for the substance to come out correctly when it becomes clogged with dust or residue. If you want better prints, you should clean the nozzle on a regular basis using a needle or other specialist equipment.
Make Changes to the Slicer Settings: The slicer software is what converts your 3D model into printer commands. It is essential to check that your printer’s settings are correct. Make sure that the diameter of the filament, the print speed, and the layer height are all compatible with your printer. Correct slicer settings optimize filament flow, avoiding under-extrusion.
Temperature Tweaking: Adjusting the temperature is crucial for successful 3D printing, just as it is when baking a cake. Find the “sweet spot” where your filament flows best by experimenting with different printing temperatures. Making this change can drastically improve your print quality by preventing under-extrusion.
Calibrate Extruder Steps: Steps in the extruder need to be calibrated in the same way that a chef measures out ingredients for a dish. If you calibrate the extruder steps, your printer will always utilize the correct amount of filament. Adjusting this metric helps eliminate filament waste and improper extrusion.
Using Quality Filaments: If you want professional-looking prints, you need to make sure you’re using high-quality filament. Spend your money on reputable brands’ high-quality filament. Using broken or low-quality filament might cause uneven flow and underextrusion. Superior print quality and material consistency can be achieved using high-quality filament.
Understanding the Extruder Mechanism: To understand your 3D printer, you must first understand its extruder. Look for misalignment or wear and do regular checks. Make sure everything is in working order and positioned properly so that the machine runs smoothly. Your printer’s output quality and reliability will both increase if broken or misaligned parts are replaced.
Regulating Cooling Temperature: Optimal cooling requires careful temperature regulation, just as with the heated nozzle. To get the best results from your printer, experiment with different cooling settings. Under-extrusion can occur if the filament does not adhere properly due to excessive cooling, while deformed filaments result from insufficient cooling.
Using Filament Dry Box: Use a filament dry box because filament, like a sponge, enjoys soaking up atmospheric moisture. When not in use, place your filament in a dry box to prevent it from drying out. Filament degradation due to moisture can cause under-extrusion and poor print quality.
Understanding Over-Extrusion and Its Causes
When 3D printers utilize too much material, over-extrusion happens. This causes deformed prints with bulging layers. The superfluous material stacks up, ruining the prints’ shape and detailing.
Over-extrusion has many causes. The printer’s settings can mislead the machine into using more material. Imagine trying to bake cookies using a recipe that asks for quadruple the sugar—they’ll be overly sweet! Prints are untidy when the printer utilizes too much material. A damaged or misplaced extruder may be another cause of over-extrusion. The extruder controls material flow via the nozzle like a gatekeeper. Over-extrusion results from improper flow control. The print speed is also an important factor. Printing at the improper pace can induce over-extrusion, just like driving too fast or slow on a rocky road might cause a car to lose control.
Don’t worry! We’ll discuss over-extrusion fixes in the next section. Understanding these solutions can help you become a 3D printing pro, making faultless and spectacular designs that reflect your creativity and skills! Let’s tackle over-extrusion with 3D printing!
8 Simple Ways to Prevent Over-Extrusion
It’s normal to be frustrated by over-extrusion, so don’t worry! Here are eight foolproof strategies for avoiding this problem and producing excellent 3D prints:
Optimize Slicer Settings: First, make sure your slicer software is optimized for your printer by double-checking the parameters. To get the best results from your 3D printer, tweak the filament diameter, print speed, and layer height to your liking. Over-extrusion can be avoided, and the amount of material utilized can be managed in this way.
Calibrate the extruder: This is similar to measuring out ingredients; it tells your printer how much filament to use. You can get better prints and waste less material if you tweak this parameter.
Check Extruder Health: Inspect the extruder of your printer for evidence of wear or misalignment, then move on to Check Extruder Health. Get rid of any broken or misaligned pieces and replace them. Over-extrusion can be avoided by maintaining a healthy and properly aligned extruder that regulates the flow of material.
Test Different Filament: Not all filaments are the same, so it’s important to try a few out. To find the filament that works best with your printer, you may need to experiment with a few different brands and types. The risk of over-extrusion is decreased, and material flow is maintained using high-quality filament.
Adjust Printing Temperature: Play around with printing temperatures until you discover the sweet spot for your filament. When the temperature is just perfect, the material can flow more freely, lowering the possibility of over-extrusion.
Change the Printing Speed: Modify the print rate until the desired results are achieved. Over-extrusion is possible at faster print speeds, while printing slowly allows each layer to cool and solidify properly.
Utilize Cooling Methods: Adequate cooling is crucial for 3D printing. For clean prints free of dripping ink, check the condition of your printer’s cooling system.
Fine-tune Retraction Settings: Over-extrusion can be avoided by adjusting the retraction parameters so that the nozzle doesn’t ooze as it moves across the print.
You can stop over-extrusion and start getting the most out of your 3D printer by following these 8 easy steps. Have fun learning how to make perfect 3D prints that will wow people and demonstrate your talents around the globe.
Best 3D Printing Software
Design anything from simple sketches to intricate masterpieces with SelfCAD, an easy to use 3D CAD software. With powerful tools for sketching, sculpting, rendering, and 3D printing, SelfCAD provides a comprehensive solution for your design needs.
Whether you’re a freelancer, a business professional, or a student, SelfCAD has got you covered. Its user-friendly interface makes it easy for beginners while offering advanced features for professionals. Plus, it seamlessly integrates with industry-standard 3D formats, ensuring a smooth workflow.
SelfCAD is convenient and accessible, with flexible storage and a web-based or offline PC version. Best part? It’s cheaper than other CAD products. No more Pro account pricing increases or software updates.
Printing Perfection Achieved!
Finally, with these 8 strategies to fix over- and under-extrusion in 3D printing, you can make perfect prints. By understanding the causes and applying effective remedies, you can eliminate sloppy and weak prints and confidently embrace 3D printing. Optimizing slicer settings, calibrating the extruder, verifying filament quality, and tweaking print rates will transform your 3D printing experience. So, unleash your creativity and create stunning 3D prints that highlight your skills and ingenuity. Print well!
-
 Guides4 years ago
6 Proven Ways to Get more Instagram Likes on your Business Account
-
 Guides1 month ago
Explore 15 Most Popular Poki Games
-
 Mainstream9 years ago
BioWare: Mass Effect 4 to Benefit From Dropping Last-Gen, Will Not Share Template With Dragon Age: Inquisition
-
 Other3 years ago
How to Improve Your Research Skills on the Internet
-
Mainstream15 years ago
The Sims 3: How to Correct the Disc Authentication Error
-
Guides15 years ago
Locked Room Escape Walkthrough
-
 Guides1 year ago
Thomas Freelance: A Company That Knows What It Takes To Do Good Business
-
Social Games14 years ago
Backyard Monsters Tips, Tricks & Strategy
Erin
September 3, 2013 at 7:34 am
Add me 5163527
Kelly
November 25, 2014 at 9:40 am
16432044
Sunderz
December 3, 2014 at 5:29 am
5underz ~ 14613689
Amy
October 9, 2013 at 11:35 am
Please add me – 6092102
Tracie
October 11, 2013 at 4:39 pm
6076283 please add me :)
Princesita
October 14, 2013 at 6:22 pm
Pls add me: 5935466
Tammy
October 15, 2013 at 2:09 pm
Add me 5854465
Christina
October 18, 2013 at 2:08 am
Please add me!! 4931254
Lisa
October 18, 2013 at 9:23 pm
6314686 my name is glwexler can people please add me??
Shazzle
October 20, 2013 at 5:01 am
6339792 add me
MagicStickMan
April 4, 2015 at 8:22 pm
K ill add u but u need to help me
Sara
October 20, 2013 at 6:16 pm
3814626: please add me
Liz
October 21, 2013 at 4:59 am
Add me. RaggedyAssPixie on game centre
Neil
October 22, 2013 at 6:52 pm
6327899 add me please people.
Jess
October 23, 2013 at 4:54 pm
Add me 6339016
sweetpcon
October 26, 2013 at 6:58 am
Please add me 6348120
Sofia
October 28, 2013 at 9:50 am
634074 Please add me! :)
punctdan
October 30, 2013 at 12:54 am
Add me 340708
Jay
November 6, 2013 at 8:27 pm
add me! 5789143
Kym
November 26, 2013 at 5:17 pm
6183142. Add me
Kris
March 11, 2014 at 8:05 pm
Add me, please! 10379233
Nat
March 26, 2014 at 2:57 am
11175241 add me
Eve
May 9, 2014 at 12:00 pm
Add Me (: 12536223
Mickeyfreak
May 17, 2014 at 7:43 am
7660157. Please add me!
Ruth
May 23, 2014 at 12:59 pm
Add me 13052371
SeraFortuna
May 25, 2014 at 4:24 am
12879194. Add me please!
xtyine
May 31, 2014 at 10:34 pm
12995743 please add!
B
June 1, 2014 at 5:15 pm
Please add me! 9356613
KendallRN
June 3, 2014 at 8:52 am
I need friends please! 13250606
Nicole
June 25, 2014 at 6:56 pm
Add me: 8572433
Hana
June 29, 2014 at 12:34 am
Add me: 13954808
SubCreation
July 4, 2014 at 1:47 pm
Please add me: 13975652
Maxx
July 7, 2014 at 2:49 am
Add me / ID 7363893 : sparklesssssss
lmn0p
July 11, 2014 at 4:14 pm
Please add me ID lmn0p – 14383417
Mysty
July 13, 2014 at 6:14 pm
Scorchberry and pento have gotten me a dangle berry twice. You have to keep trying but eventually it works.
David-Tx
July 14, 2014 at 2:44 am
Add me please: 333460
mayrahlove
July 23, 2014 at 3:17 am
13536605 add me please!!!! ?
ConfucianKoala
August 10, 2014 at 4:22 pm
12002117
backfireblack
August 30, 2014 at 3:23 pm
Add me please 13908871
Meggy
August 30, 2014 at 11:10 pm
15967272
Krissy 66
September 10, 2014 at 4:24 am
Please add me
16122394
c
September 17, 2014 at 7:19 am
12995743 please
lisa
September 30, 2014 at 11:52 pm
Add me 16722499 thanks
Angel
October 4, 2014 at 10:07 am
Add me! 16418172
omason
November 19, 2014 at 10:30 pm
add me please 3538643
nikkou
November 21, 2014 at 3:54 pm
please add me :) 1794 0650
SuzieQ999
November 22, 2014 at 5:45 am
Add me please 17925879
tygress23
November 22, 2014 at 8:42 pm
Friend code: 302350
MBUX
December 4, 2014 at 1:25 am
ADD ME PLEASE 4708864
lauren
December 10, 2014 at 1:42 am
add me 15385862
Betty
January 10, 2015 at 4:56 pm
How do you make it rain? It always says rain will make your trees grow ?
momof4in2000
January 17, 2015 at 10:58 pm
Please add 17932678. Anyone know what combination makes the white seed tree?
Vv
February 14, 2015 at 2:54 pm
My friend code 99510
MagicStickMan
April 4, 2015 at 8:25 pm
Hello? im MagicStickMan
MagicStickMan
April 4, 2015 at 8:26 pm
Ill try to add u all?
MagicStickMan
April 4, 2015 at 8:28 pm
Thx Calin Caiabi for your help