100 Missions Walkthrough: Mission 1 (Complete walkthrogh!)
 100 Missions is one really amazing escape the room app created by the same people behind 100 Doors. I am here to share with you a walkthrough for this amazing game, which at the moment has just one mission: but it’s challenging and awesome and I am sure you’ll love to complete it. So read on for the 100 Missions Walkthough, the mission 1 walkthrough. And please note that this is the FIRST complete walkthrough for mission one on the Internet!
So read on for the complete 100 Missions walkthrough, mission 1 or level 1 walkthrough:
1. First, we need to restore the power supply: go three times to the right and tap the table. Get the screwdriver from it.
2. Go back and three times to the left and click the power supply to the left of the room. Use the screwdriver (select it by tapping the square to the left which reveals inventory) and unscrew the two buttons.
3. You need to look where each color leads, but I have it for you: top is blue, below is yellow, green and red. Go back and hit the light switch. Ahh, light!
4. Go back and tap the dresser to the right. Take the hammer. Then tap the pocket line on the brown costume (the middle one). You have to tap the place exactly until you get a piece of paper with a code on it. More on that later!
5. From the same screen, go left and back to see some shoes. Get the shoe lace from one shoe.
6. Go back and right. Tap the wall near the chess table and use the hammer to break the wall. Take the voice recorder from the skeleton’s hand.
7. Go back and two times to the right. Enter the bathroom there by using the white door.
8. From the first screen, pick up a piece of paper from the trash can near the sink. Then tap the sink and get the small key.
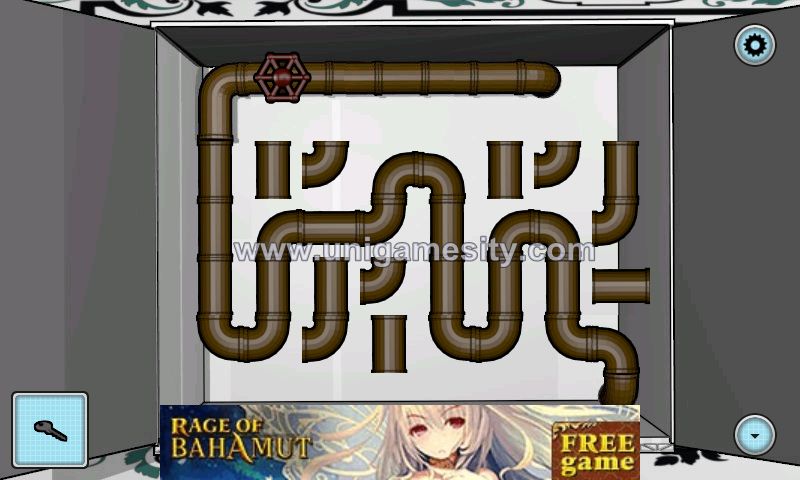
9. Go back and left and use the small key to open the box on the wall. There you have to tap each of the pipes to connect them from one end to another. You can check out below how the completed puzzle should look like (and you don’t have to use all pipes!):
10. After completing the water pipes puzzle, tap the red valve in the upper left corner. Go back twice and once to the right and tap the toilet – get the key!
11. Exit the bathroom and go to the TV area. Click the shelves under the TV and use the key to open the top left drawer. Get the blank piece of paper. Open the bottom right shelf and get batteries and paper clip.
12. Go back and twice to the right and tap the drinks bar. Use the hammer to break the piggy bank and take the coin.
13. Go back to the bathroom and tap the sink. Open the inventory and drag the paper clip to the shoe laces to make a hook. Use it to get a small gold plated key from down the drain.
14. Go back and use the small key to open the top drawer in front of the bathroom door. Take the ultraviolet lamp.
15. In your inventory, drag the batteries over the ultraviolet lamp.
16. Go to the door and turn off the lights. Go back to the pool table and click the ruined painting. Use the ultraviolet lamp to reveal the code: ><><<>
17. Turn back the lights on. And move to the pool table. In your inventory, drag the hammer on the coin and use the flat coin on the coin hatch of the pool table (in the lower right part of the table). When used correctly, you will get a message that something moved.
18. Go back and zoom in on the safe where the painting was. Use the code revealed with the UV lamp to open the safe: slide on the lock of the safe: right, left, right, left, left, right. Get the cassette, flash disk and magnetic card from the safe.
19. Go to the computer and place the flash drive inside. Now use the code as instructed by the piece of paper with shapes & the puzzle piece of paper that you got from the trash. The code is 4519
20. Go to the printer and use the blank piece of paper to reveal the code for the morse code.
21. Drag the cassette to the player and listen to it. The morse code tells you the last code. After unscramblig it, the code is 5714.
22. Go to the entrance room and use the magnetic card on the lock. Use the code (5714) to exit the door!
And this is it! The final step of the walkthrough is here and you have completed 100 Missions and I finally managed to complete the 100 Missions walkthrough – the first complete walkthrough for this game to be published! It took me a great deal of time to do it, so I really hope you find it useful.
UPDATE: 100 missions Level 2 walkthrough is here, make sure to check it out!










12 comments